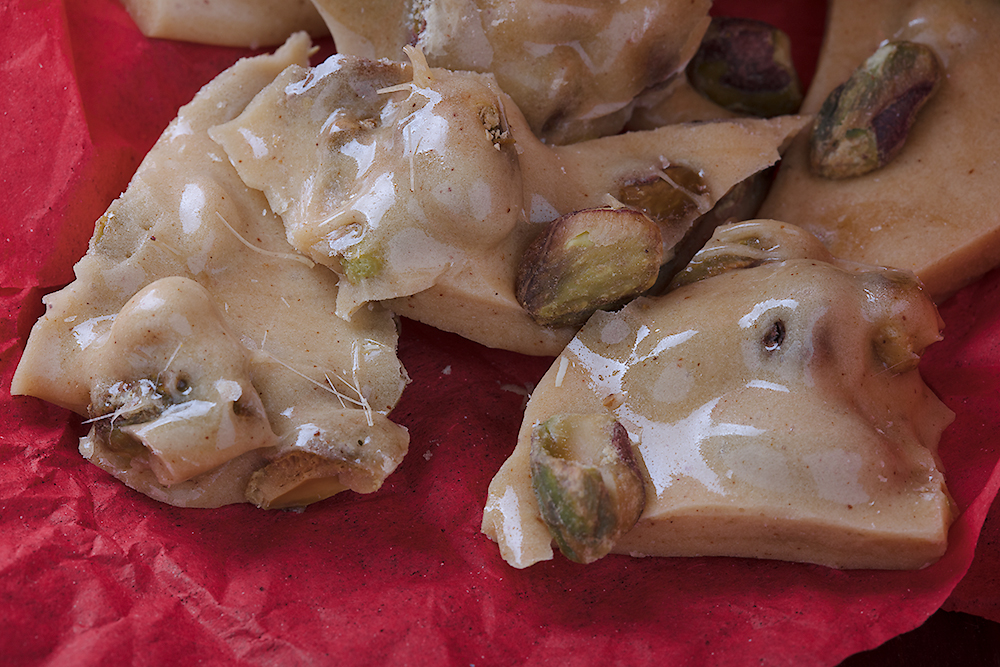
Adventures in Thyme

Our adventures in food

  • Home
  • Contact

Hard Cider Brittle

November 22, 2016 by Ginger Leave a Comment

Pistachio Brittle by D Fenwick, http://dfenwickphotography.com

Pistachio Brittle

I love Fall.  The changing colors of the leaves, the crisp mornings, and the fellowship of holiday season.  Our gifts to friends and family are usually small tins of baked yumminess, or a cookie variety plate.  This year in our quest to add to the gifting repertoire I considered brittle.  Hot sugar however requires a little extra minding than a mere oven timer.  Please be careful if you have little ones in the house, or are attending to chores elsewhere – a boiling pot of sugar needs to be watched!  You’ll also need a candy thermometer for this one. Let’s get cooking!

Ingredients

1 cup hard cider (I used a pumpkin flavored)
1 cup light corn syrup
3/4 cup sugar
1/2 tsp cinnamon

1 tsp baking soda
2 Tbsp butter (room temperature) + extra for baking pan
~1 cup roasted/salted pistachios (shelled of course)

Warm an oven to 200 degrees Fahrenheit.  Prepare a baking pan lined with tin foil (and lightly butter).  Place in oven.

Into a pot add the hard cider down to cinnamon.  Stir to combine and heat until 300 degrees Fahrenheit, which is Hard Crack stage.  You will be tempted to stir this as it boils, DON’T.  The sugar up the side of the pot crystallizes and can alter the consistency of your brittle.  It probably took my pot about 30 mins to hit hard crack so be patient.

As you get ready for Hard Crack to be reached on your candy thermometer, have the butter and baking soda standing by.  Once the magic number is reached, swiftly remove the pan from the oven and set close by.  Remove your pot from the burner and add the butter and baking soda to your pot.  Stir quickly and thoroughly to incorporate.  Add pistachios and stir – your mixture will be solidifying which is going to make spreading it in the pan difficult – hence the warm pan and your expeditious stirring skills!

Pour the mixture onto the pan and quickly spread out as best as you can.  This sugar will be VERY hot, please be careful.  Sprinkle more pistachios on the top as you like.  Set aside to cool.

The pot and any utensils you used should be soaked in hot water to help you clean up.

Once the brittle is cooled, break into bite sized or gift bag sizes. I angled sheet of cooked brittle and gently knocked it from the underside with a lemon squeezer so as not to damage the pretty face of the brittle.  🙂

Enjoy!


Filed Under: Photo, Recipe Tagged With: brittle, candy, hard cider, pistachio, pistachios, pumpkin

Jalapeno Artichoke Dip

November 12, 2016 by Ginger Leave a Comment

Artichoke Jalapeno Dip by D Fenwick, http://dfenwickphotography.com

Jalapeno Artichoke Dip

So there we were faced with a spicy food photography assignment.  Out of time, I resorted to a favorite family recipe.  Well, it’s my favorite and it’s my sister’s so I guess that makes it a family favorite.  🙂

Ultimately, the photo above didn’t have that epic spicy look to it; so we settled on a close up of me biting into a bright orange habanero.  Believe me, that WAS spicy, and the photo well received at the webinar.  But this post is about Dip!  Creamy, yummy Jalapeno Artichoke Dip, so let’s get started.

You’ll need:
1 jar marinated artichoke hearts, drained (I used 6.5 oz, but if you like artichoke hearts, use the bigger one!)
1 8oz package of cream cheese
1 cup mayonnaise
1 cup Parmesan cheese
3 cloves garlic, minced
3 jalapenos (I love the seeds, but most can’t tolerate them, so leave them or remove them, your choice)

Using a food processor, drop in the artichoke hearts and pulse a few times, then add the garlic and jalapenos.  Process till finely chopped then add remaining ingredients.  Pulse to combine fully.

Into an oven safe dish bake at 350 degrees F until it begins to bubble.  In my oven that’s about 40 minutes.  A slightly brown crust on the top will begin to develop.  Remove, let cool a bit and serve with crackers or sourdough bread.  Enjoy!

Filed Under: Photo, Recipe Tagged With: Artichoke, dip, Jalapeno, snack

Beef and Pasta in Red Sauce

June 8, 2016 by Dan Leave a Comment

Beef with Pasta in Red Sauce by D Fenwick, http://dfenwickphotography.com

Beef with Pasta in Red Sauce


Red sauce is so versatile at mealtime, we’ve been playing around with making a better one, and I think we’ve hit on a winner. Give it a whirl in the pot and let us know what you think!

2 lbs Beef
Olive Oil
1 cup Red Wine
32 oz box of Beef Stock
12 oz can Tomato Paste
14.5 oz can Diced Tomatoes
2 teaspoons dried Rosemary
2 teaspoons dried Basil
1 teaspoon dried Oregano
1 teaspoon Cinnamon
1 teaspoon Salt
1 teaspoon Black Pepper
1/2 teaspoon Worcestershire Sauce
2 Tablespoons Honey
2 Tablespoons good Balsamic Vinegar

Start by slicing your meat into 1/8 inch strips and cutting the strips into bite sized pieces. Tip: If you cut against the grain it’s a lot more tender! Add a little olive oil to the bottom of your pot (a 3 or 4 quart pot with a lid) and heat the pot to medium on the stove top. Add the beef to the pot being careful not to over crowd it.  Cook the beef in a couple of batches; cooking until lightly browned on both sides. Remove the beef and set aside (a bowl in your refrigerator is a good idea.). Add the red wine and beef stock to the pan and scrape the bottom of the pan with a wooden spoon to get all the good bits off the bottom – that’s where the flavor is! Add the tomato paste and stir to combine. Add all of the spices. (I put all of my spices in a coffee grinder and ground them to powder before using.) Add the honey and balsamic vinegar, stirring until well combined. Bring the mixture to a boil and reduce the heat to low. Cover and let the sauce simmer for an hour or so. Return the meat to the pot and bring the mixture back to a simmer, and leave it to simmer for another 15 or 20 minutes.

Serve over your favorite pasta and add a vegetable and some nice, crusty bread for dinner.

Filed Under: Photo, Recipe Tagged With: beef, pasta, red sauce, tomato, tomato sauce

Steak – One Pan Meal

May 4, 2016 by Dan Leave a Comment

Steako one pan meal


Tonight we offer a “one pan meal”, because some nights, you don’t have enough strength to clean more than one pan after dinner!

2 to 3 pounds of steak (I used ribeyes)
2 large white Sweet Potatoes
1 Sweet Onion
1 good Broccoli Crown
1/2 head of Cauliflower
Your favorite steak seasoning, I used:
Rosemary
Thyme
Cinnamon
Seasoned Salt
Pepper

Preheat your oven to 400 degrees F. Line a half sheet pan with cooking parchment.

Peal the sweet potatoes and cut into wedges. Cut the broccoli and cauliflower into florets. Cut your onion into wedges. (Or substitute your favorite vegetables that roast nicely.) Lightly coat the sweet potato wedges and the vegetables with olive oil. Toss with a bit of your steak seasoning. Lay the sweet potato wedges in around the edges. Place the rest of the vegetables in the middle of the pan, so you have a nice even layer in the pan. Season your steaks and lay them on top of the vegetables.

Place your pan in the oven and bake at 400 degrees for 20 minutes or so. Turn the steaks over and cook until they are as done as you wish. Remove the steaks and cover with aluminum foil. Put the vegetables back in the oven and bake until the vegetables begin to brown. (The total cooking time was about 40 minutes in our oven.) Remove the vegetables from the oven. Serve the steaks with the vegetables and sweet potato wedges.

Enjoy a delicious dinner, and the bonus – one pan in the sink!

Filed Under: Photo, Recipe Tagged With: Dinner, One Pan Meal, rib-eye, Steak, Sweet Potato

Grain Free “Strawberry Shortcake” Cookies

March 23, 2016 by Ginger Leave a Comment

Gluten Free Cookies


Note: M&M’s cannot be reliably assumed to be gluten free, nor with wheat in the facilities, reliably grain free either.  If you are highly sensitive to even trace amounts of gluten or grains, please don’t take a chance with M&Ms.

So there I was, meandering through Target and a pink bag of M&M’s caught my eye.  White Strawberry Shortcake M&M’s to be exact.  I knew these little treats would be wonderful in a cookie, and thus my quest began.

I’ll be honest with you, grain free cookies are not for everyone.  The coconut flour I used can be oft-putting to some, but for those sensitive to grains this is an enjoyable little cookie.  The applesauce keeps them quite moist.  I loved them best straight out of the fridge, where their cold chewiness paired well with a hot cup of Earl Grey Tea.  The addition of the M&Ms into the batter upped the yummy factor, but switching them out for dried fruit would work well too.

Let’s get cooking!

Preheat oven to 350 and place a silpat/non stick baking sheet in the pan.

2 eggs, beaten
1 cup applesauce
1-1/2 tsp vanilla
3/4 cup white sugar
3/4 cup brown sugar (packed)
2 Cups coconut flour
1 tsp salt
1 8oz bag of White Strawberry Shortcake M&Ms

Begin by mixing the eggs and applesauce, then slowly move down the list.  So mix in the vanilla.  Next mix in the sugar, etc.

Because these cookies will not rise, the amount of dough you use and how you shape that dough will be what the final cookies look like.  I used a melon baller to scoop out about a tablespoon, rolled and then pressed them into shape on the baking mat.  Cook about 12-15 mins.

These cookies will be crumbly for a few hours after baking.  Placing them in the fridge will help them stay together.

Enjoy!


Filed Under: Photo, Recipe Tagged With: coconut flour, Cookies, dessert, grain free, snacks

  • 1
  • 2
  • 3
  • …
  • 24
  • Next Page »

Recent Posts

  • Hard Cider Brittle
  • Jalapeno Artichoke Dip
  • Beef and Pasta in Red Sauce
  • Steak – One Pan Meal
  • Grain Free “Strawberry Shortcake” Cookies
  • Meatballs with options for everyone at your party
  • Chicken for game day
  • Spaghetti with sliced beef
  • Baked Salmon in Puff Pastry
  • Christmas Dessert for Two

ARCHIVES

  • November 2016
  • June 2016
  • May 2016
  • March 2016
  • February 2016
  • January 2016
  • December 2015
  • November 2015
  • October 2015
  • September 2015
  • August 2015
  • July 2015
  • June 2015
  • May 2015
  • April 2015
  • March 2015
  • February 2015
  • January 2015
  • December 2014
  • November 2014
  • October 2014
  • September 2014
  • August 2014
  • July 2014
  • June 2014
  • May 2014
  • April 2014
  • March 2014
  • February 2014
  • January 2014
  • December 2013
  • November 2013
  • October 2013

Categories

  • Cooking Information
  • Event
  • Photo
  • Recipe
  • Recipe Modifications
  • Restaurant

Meta

  • Log in
  • Entries feed
  • Comments feed
  • WordPress.org

Copyright © 2023 · Foodie Child Theme by Shay Bocks · Built on the Genesis Framework · Powered by WordPress