Adventures in Thyme

Our adventures in food

  • Home
  • Contact

Archives for July 2014

Trifle

July 30, 2014 by Ginger 1 Comment

Banana, strawberry, blueberry trifle by D Fenwick, http://dfenwickphotography.com

Banana, strawberry, blueberry trifle

During my years in England I ate Trifle like there was no tomorrow, because eventually “tomorrow” was going to come along and I’d be returning to America.  I loved the silky custard and the cake, soft and juicy from the fruit.  It was whole milk there, with lots of cream and no care of calories.  Well, 30 years later, it’s time to worry about those things, as well as dairy intolerances.  So my little Trifle described below should really be used more like a roadmap than a recipe.  Use the type of custard that you like, or instant vanilla pudding, perhaps heavy whipped cream instead of imitation cream topping.  The fruit also should be what appeals to you, and with so much available in the market right now, it’s perfect season to sit a’spell and indulge in a little Trifle.

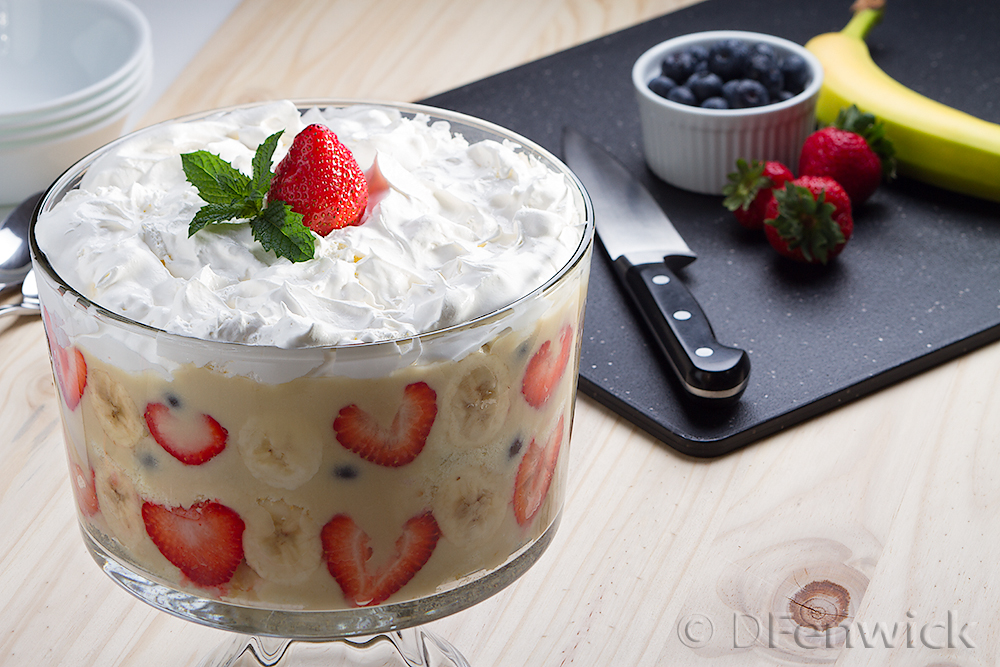
Basically, a Trifle needs a variety of fresh fruit, whipped cream, cake, custard and alcohol (which is optional, Sherry is “traditional”).  Our Trifle above uses Bird’s Custard (a powdered product from England, you can find it at most Raley’s or World Markets).  Because dairy free is important at my house, we used Almond milk to make the custard and a dairy free topping.  Jellies can also be used in lieu of, or in addition to fruit, but we used 5 bananas, 3 cups of sliced strawberries, 3 cups of fresh blueberries.  We used pound cake, but you could also use angel food cake, or yellow cake, etc.

The custard needs to be cooled prior to making this dish, but once you’ve got all your ingredients prepped (fruit sliced, cake cubed or thinly sliced for layering) you’re ready to go.

In our photo we layered as follows: cake-fruit-custard, cake-fruit-custard, whipped topping; but you can layer as your tastebuds direct.  Maybe you want to soak your cake in Sherry before you layer, maybe you’d prefer a layer of whipped cream in the middle of the layers – do what sounds good.  Enjoy!


Filed Under: Photo, Recipe Tagged With: Banana, blueberry trifle, strawberry

Lamb Calzone

July 23, 2014 by Ginger 1 Comment

calzone

Ta-da!  Our first “hand-pie” here at Adventures in Thyme.  This tasty treat can be partially made in advance and stored in the fridge until you’re ready to assemble and bake.  The frenchbread crust is ideal for the juicy filling.  It’s delicious so let’s get cookin’!

For the filling:
1lb ground lamb
1 diced medium onion
3 cloves finely minced garlic
1 cup sheep’s feta (but if you can only find goat, go for it!)
2 beaten eggs
~5-8oz of cut spinach (we just buy the little box of frozen spinach)
~1 tsp of salt
~1 tsp each of fresh minced rosemary and thyme
~1 Tablespoon of butter

On medium heat, heat the butter in a skillet and add the diced onion.  Fry until they begin to get translucent (about 8 mins).   While you’re waiting on the onions you have time to defrost the spinach (if you have not done so already). Quick and easy method is to place the frozen spinach into a fine strainer and either place in a bowl of warm water or hold under a faucet of warm water. Once the spinach is “loose” squeeze out the water. Take this as an opportunity to work out your frustrations – squeeze!!!  Set aside when done.

Once the onions are translucent add the lamb and cook until almost done (there’s still a little pink in the meat), add the garlic & salt and continue cooking.  Now we’re ready to add the spinach, our goal here is not to cook the spinach, that will happen when we bake the calzone, we’re only trying to incorporate the spinach evenly into the hot lamb mixture.  After mixing the spinach into the lamb, the meat should be done, so remove from the heat and carefully drain off as much of the grease as you can then stir in the herbs.  Allow this mixture to cool, then add the cheese and eggs.  IMPORTANT: If you add the eggs in while the mixture is hot, you will have scrambled eggs, but what we’re doing is adding the eggs as a binder, so we don’t want it to cook just yet.  Mix well.  At this point you can move on to assembly or place into the fridge for later in the week.  Our sauce recipe, below, can also be made in advance and stored until needed.

For the crust:
1 11oz container of French bread dough.  They come in a tube, the kind that pops.  You know which ones…
Rolling pin, smooth surface, ~ a cup of flour
Parchment paper

Prepare a smooth surface with a little flour so that our dough won’t stick, then remove the dough from the tube and cut in half.  Roll each half into a ball with your hands.  Carefully roll out each dough ball into a circle (think pizza) about 1/8″ thick, maybe a little thinner.  Transfer each rolled piece of dough onto parchment paper slightly larger than the dough.

Assembly:
1 beaten egg
Baking pan

Begin heating your oven to 350 degrees F.

Place one of the pieces of parchment paper onto your baking pan.  Place 1/2 of the meat filling onto one half of the dough (you will fold the other half over to make the top.)  IMPORTANT: Do not add meat to the edges, you will need space to seal, roll and crimp (look at the image above for reference).  Once the meat is on the dough brush your beaten egg mixture along the outside curve of your dough, about 1/2 inches worth.  Now carefully fold your dough over matching the edges, now, brush more of your beaten egg along the top edge of the dough, brush from the edge of the meet out to the edge of the dough.  Roll the edge over the egg to seal the edges and crimp with the back of a fork.  Do the same with the 2nd piece of dough/parchment.  You might need to cut the parchment at this time so both calzones can fit onto your baking sheet.

Once you have two complete calzones, take the remaining egg wash and brush the surface of each calzone, this will help them brown up so enticingly.  Now cut 3 slits along the top of each to allow steam to release during the cooking process.  Place into the oven for about 45 minutes or until the dough is a lovely golden brown.

While the calzone is cooking it’s time to start our sauce.

Sauce:
2 15oz cans of tomato sauce
1 can tomato paste
1/4 cup honey
1/4 cup balsamic vinegar, I like the one from Wine Country Kitchens
2 tsp chopped fresh rosemary
1/2 tsp chopped fresh thyme
1/2 tsp salt
1/2 tsp ground black pepper
1/2 tsp cinnamon

Into a saucepan add all the ingredients above and cook over medium heat.  Stir occasionally, turn down to a simmer once it begins to boil.  The longer your sauce cooks the thicker it will get so cook it to your preference.

To serve, cut the calzone in half, place on a plate and top with the sauce.  This serves four if you have side dishes to go with it.  We’d recommend a nice salad, some fresh vegetables and maybe a dinner roll or some garlic bread.

Enjoy!

Filed Under: Photo, Recipe Tagged With: balsamic vinegar, calzone, Dinner, feta, Lamb Calzone. lamb, spinach

Strawberry Ice Cream

July 16, 2014 by Dan 1 Comment

Strawberry Ice Cream by D Fenwick, http://dfenwickphotography.com

Strawberry Ice Cream

Sometimes you just have to give in to your urges, and today we succumb to ice cream’s siren song.

Homemade ice cream has been made so much easier with “modern” ice cream makers.  Do you remember the ones we used way back when with rock salt, and hand cranked it?  Well, today we can use electric ice cream makers and have our ice cream in about 30 mins of churning.  So, let’s get cookin’!

4 cups Goat Milk or substitute 2 cups regular Whole Milk and 2 cups Half and Half
1 1/2 cups Sugar
6 fresh Egg Yolks
1 pound Strawberries
1 Vanilla Bean

Separate 6 eggs so you have 6 fresh yolks. (You can keep the egg whites for another project if you wish.) Beat the egg yolks in a bowl until smooth.

Hull the strawberries. Place 1/2 pound of strawberries and 1/4 cup of sugar into a blender and puree. Take the remaining half pound of strawberries and cut them into small pieces, add 1/4 cup of sugar, stir and refrigerate until ready to use.

Combine 2 cups of milk and 1 cup of sugar in 2 quart pot. Halve your vanilla bean and scrape out the seeds. Add the bean and the seeds to the milk mixture. Heat over low heat, stirring regularly, until the sugar is dissolved and milk begins to steam. Note: Do not leave milk on the stove unattended, if it boils over it can cause a fire.

Add half a cup to a cup of the milk mixture to the eggs, a little at a time. Whisk in the milk as you add it. Keep stirring and add only a little at a time. You want to temper the eggs, not make scrambled eggs. Once this is combined, add the egg mixture back into the hot milk, whisking to blend thoroughly. Cook until it begins the thicken and coats a spoon. Remove from the heat and pour through a strainer into a mixing bowl. Now add the remaining 2 cups of goat milk or 2 cups of half and half and then add the pureed strawberries. Blend well. Place the mixture in the refrigerator until chilled (a couple of hours at least.)

Once the mixture is cool, place in an ice cream maker and freeze per manufacturer’s directions. Once frozen, mix in the cut up strawberry pieces (do not add the juice, it will make the ice cream freeze strangely) and place in your freezer until firm.

For a variation, you can substitute any summer fruit for the strawberries.

Filed Under: Photo, Recipe Tagged With: dessert, ice cream, strawberry

Berry Filled White Cake

July 9, 2014 by Dan Leave a Comment

Berry filled white cake by D Fenwick, http://dfenwickphotography.com

Berry filled white cake

Doesn’t that picture look awesome!  A triumvirate of cakey goodness – three delicious layers of divinely concocted cake with fruit.  It’s healthy – seriously!  Look at the fruit, and of course there’s eggs, and milk and…  Just eat it – you’ll love it and not care about the calories.  Let’s get baking!

Berry Filled Cake

Cake

2 cups white Sugar
1 cup (2 sticks) Butter, at room temperature
4 Eggs
4 teaspoons Vanilla
3 cups all purpose Flour
4 teaspoons Baking Powder
1 1/2 cups Milk (we used goat)

Preheat your oven to 350 degrees. Line and flour 3 9 inch round cake pans.

Sift together your flour and baking powder. Set aside.

Cream butter and sugar in mixer. Add eggs, one at a time, beat each one in before adding the next. Add vanilla. Beat until blended in.

With your mixer at a lower setting (if you use a high setting you’ll have flour everywhere) add your dry ingredients, 1/4 at a time. Mix well. Add milk and mix until smooth. If it doesn’t look silky, add additional milk 1 tablespoon at a time, until batter is smooth. This batter is thick – be warned.

Put 1/3 of your batter into each pan. Spread so it is level and evenly distributed in the pans.

Bake at 350 degree F for 30 minutes. If a toothpick stuck in the middle of the cake comes out clean, remove from the oven. If not, cook another 5 minutes and check again. Repeat as needed. (Note: cooking times will vary depending on your oven.)

Cool the cakes for a few minutes, then turn out of the pans and cool on a rack until room temperature.


Strawberry Glaze

2 cups sliced Strawberries (fresh are definitely best – and they’re in season!)
1 cup Water
1 cup white Sugar
4 tablespoons Corn Starch

Combine sugar and water in 2 quart sauce pan. Heat over medium low heat, stirring occasionally until sugar dissolves completely. Turn heat down to low and add the strawberries. Cook, stirring gently, occasionally, until the juice from the strawberries is well incorporated into the syrup. (30 to 45 minutes.) Strain out the sliced strawberries and let the syrup cool to room temperature or so. Carefully mix in your corn starch so you have no lumps. Return the syrup to your pan and heat at medium high until it thickens and begins to bubble. Stir constantly. Once done, remove from heat and cool to room temperature.


Buttercream Frosting

4 sticks (2 cups) Butter
6 cups powdered Sugar
2 teaspoons vanilla
Milk

Cream your butter in your mixer until light and fluffy. Add the powdered sugar, carefully so you don’t get it all over the kitchen, and mix until blended and smooth. Add milk 1 tablespoon at a time until you get a spreadable consistency.


Berry Filling

2 cups sliced Strawberries
2 cups fresh blueberries (or raspberries / blueberries / insert favorite fruit here)
Strawberry Glaze (see above)

Combine your fruit with some of your strawberry glaze so that it coats the fruit.


Assemble your cake

First, make a paper template for the area you will be cutting out of your cake. (You will be removing the grey area in the picture.) Make the template to the ring has a 3 inch inside diameter and a 6 inch outside diameter. Place the template, centered, on one layer of your cake and carefully cut around the inside and outside of the template. The area you are removing is where the berry filling will go.

Layer template

Place a whole layer on your cake plate and cover the top with a layer of frosting. Add the center and outside rings from the layer you cut into rings above. Carefully add filling so that the fruit and glaze fills the ring. Now cover this layer, including the filling, with a layer of frosting. Place the remaining whole layer on top. Frost the cake with your remaining frosting. Serve in slices, topped with some of your remaining filling and extra glaze as desired.

Store in the refrigerator. Eat within a few days.

Filed Under: Photo, Recipe Tagged With: berry, blueberry, buttercream, buttercream frosting, cake, dessert, filled, strawberry, white cake

Balsamic Glazed Pork Chops

July 2, 2014 by Dan 1 Comment

Balsamic Glazed Pork Chops

Balsamic Glazed Pork Chops

We’re firing up the bbq again for this delicious Balsamic Glazed Pork Chops dish.  The glaze is a lovely balance between the acidity of vinegar and the sweetness of honey.   We’ve placed it over rice noodles but you could easily substitute fried rice or a baked potato.  Let’s get cookin’!

Ingredients:

1/2 cup good Balsamic Vinegar
1/4 cup Honey
fresh Rosemary
Salt
Pepper
Cinnamon
4 Pork Chops
Noodles / fried rice / vegetables as desired

Light your bbq, you’ll want a direct fire.  We prefer charcoal.

Finely chop a sprig of fresh rosemary.

In a small sauce pan, combine 1/2 cup balsamic vinegar (for best results, use a good balsamic, I like the one from Wine Country Kitchens.) and the honey.  Add half of the chopped rosemary. Heat over low heat until the honey combines with the vinegar and the mixture begins to thicken.  Keep just warm so it doesn’t over thicken.  You will need to be able to pour or spoon the glaze.

Season your pork chops by lightly sprinkling with salt, pepper, a little cinnamon and the remaining rosemary.  Be sure to season both sides of the meat.  Grill for 10 to 15 minutes per side (depending on how thick your chops are and how hot the fire is.  In cold weather it may take longer to cook them.  An open grill may also take longer.)  Five minutes before the chops are done, spoon some of your glaze over the pork chops, cover and let the chops finish cooking.

We served these chops over noodles and drizzled the remaining glaze over the noodles and chops.  In the background above  you can see bbq’d apples with a little bit of spiced brown sugar.  Your grill is still hot – add a little bit of dessert before you shut the bbq down and take another bite out of summer’s bounty.

Enjoy!

Filed Under: Photo, Recipe Tagged With: balsamic, balsamic vinegar, chops, Dinner, glaze, glazed, Pork, pork chops, rosemary

Recent Posts

  • Hard Cider Brittle
  • Jalapeno Artichoke Dip
  • Beef and Pasta in Red Sauce
  • Steak – One Pan Meal
  • Grain Free “Strawberry Shortcake” Cookies
  • Meatballs with options for everyone at your party
  • Chicken for game day
  • Spaghetti with sliced beef
  • Baked Salmon in Puff Pastry
  • Christmas Dessert for Two

ARCHIVES

  • November 2016
  • June 2016
  • May 2016
  • March 2016
  • February 2016
  • January 2016
  • December 2015
  • November 2015
  • October 2015
  • September 2015
  • August 2015
  • July 2015
  • June 2015
  • May 2015
  • April 2015
  • March 2015
  • February 2015
  • January 2015
  • December 2014
  • November 2014
  • October 2014
  • September 2014
  • August 2014
  • July 2014
  • June 2014
  • May 2014
  • April 2014
  • March 2014
  • February 2014
  • January 2014
  • December 2013
  • November 2013
  • October 2013

Categories

  • Cooking Information
  • Event
  • Photo
  • Recipe
  • Recipe Modifications
  • Restaurant

Meta

  • Log in
  • Entries feed
  • Comments feed
  • WordPress.org

Copyright © 2025 · Foodie Child Theme by Shay Bocks · Built on the Genesis Framework · Powered by WordPress