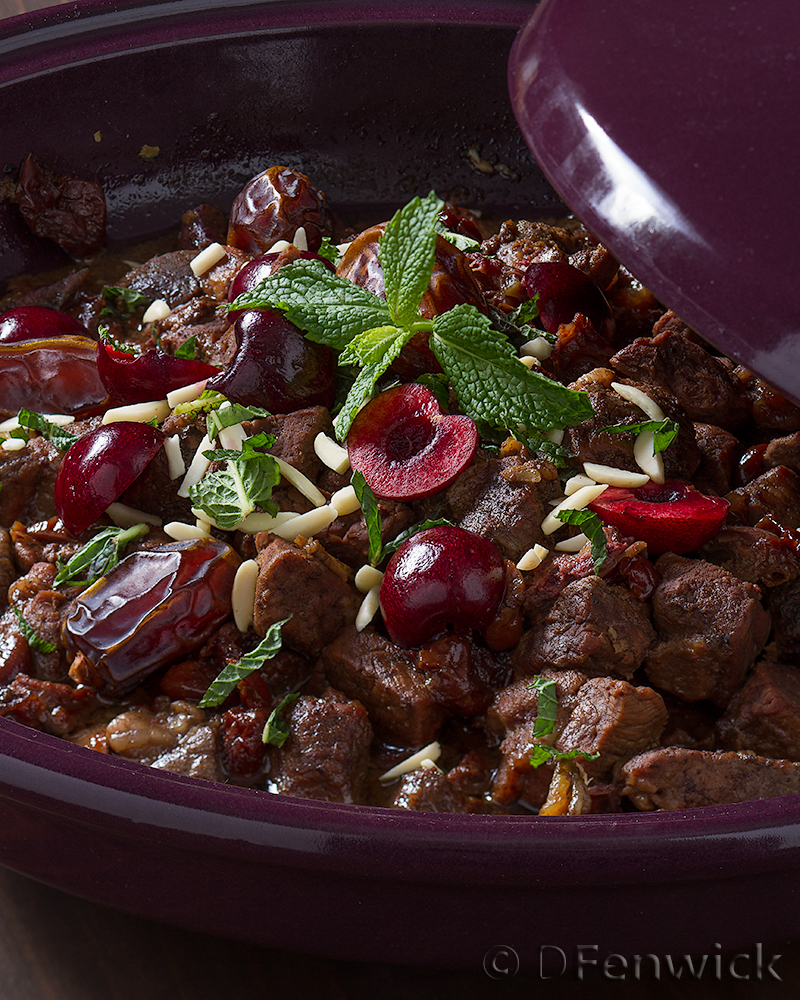
Adventures in Thyme

Our adventures in food

  • Home
  • Contact

Archives for August 2014

Lamb Tagine with Cherries and Mint

August 27, 2014 by Ginger Leave a Comment

Lamb, Cherry Tajine by D Fenwick, http://dfenwickphotography.com

Lamb, Cherry Tagine

We recently celebrated our 12th wedding anniversary, and what better way to say “I still do” than the gift of a cooking pot.  Certainly it fits in with the old saying that “the way to a man’s heart is through his stomach”.  So here’s to many more years of good loving, and good eating!

A tagine references not only the earthenware pot the meal is cooked in, but the meal itself.  Our recipe can also be cooked in a dutch oven or a crockpot, so just use whatever you have on hand.

You will need:

Fresh ginger – 1/2 inch up to 1 inch finely chopped
3 cloves of garlic finely chopped
3 tablespoons olive oil
pat of butter
2 cinnamon sticks
~1/4 cup of honey
~1/2 cup dried cherries
~1/2 cup fresh cherries, pitted and halved
~1/2 cup pitted dates cut into 1/2 inch pieces
~3 lbs lamb (or beef, or chicken, etc) cubed evenly; if you are using chicken pieces like thighs, just leave as is.
several sprigs fresh mint chopped coarsely
slivered almonds are optional

With a  mortar and pestle, carefully grind the ginger and garlic into a paste. Once it has reached the right consistency heat the oil and butter in a fry pan (if you’re using a crockpot) or heat directly in your tagine pot.  When the oil is hot, add the paste and incorporate into the oil, then add the cinnamon sticks.  After a few minutes the cinnamon aroma will get stronger and the paste will begin to change color, add the meat and sear the outside.

Now add the honey and the dried cherries.  Mix gently and then place your dates around the outside ring of the meat, then add enough hot water to fill the bottom of the pot but not to cover the meat.  Once the pot begins to boil, turn the heat down, cover and cook approximately one and half hours or until done.

Garnish with whole dates, slivered almonds, chopped mint and pitted, halved fresh cherries.

Serve with couscous or wild rice.  Enjoy!


Filed Under: Photo, Recipe Tagged With: Cherries, Dinner, Lamb, Mint, Tagine

Blueberry Ricotta Pancakes

August 20, 2014 by Dan Leave a Comment

Blueberry Ricotta Pancakes by D Fenwick, http://dfenwickphotography.com

Blueberry Ricotta Pancakes

Ever have one of those days where a comforting breakfast after work is just what you need to unwind?  Well, we had one of those days.  So what better to forget the stress of deadlines and ease “ruffled feathers” then a blueberry pancake with warm maple syrup.  Oh, and I did I mention the ricotta?  Silly me…

This pancake recipe is based on a standard recipe in many old cookbooks. We’ve modified it for our use here.

Ingredients:

4 cups Flour
2 tablespoons Baking Powder
1 teaspoon salt
1/2 cup Sugar
4 Eggs
3 cups Milk
1/2 cup Vegetable Oil
1 cup Ricotta (we used ricotta made from sheep’s milk)
1 pound fresh Blueberries
Maple syrup, warmed

Combine the dry ingredients in a large bowl. Form a bowl in the center of the dry ingredients.

Lightly beat the 4 eggs and combine the wet ingredients, except for the cheese. Add the wet ingredients to the dry ingredients and stir gently to combine. Gently mix the cheese into the batter.  Be careful not to over mix the cheese, just gently fold it into the batter.  You’ll want some lumps to retain their plumpness – this will make for a yummier pancake later.

Let the batter stand for a few minutes while your griddle heats.

Use a 1/4 cup measuring cup to measure out your batter onto your lightly greased griddle, spread slightly as you pour it on. Immediately place some blueberries into the batter for each pancake (this keeps your pancakes from turning blue.) Cool until golden brown on one side, flip and cook on the other side.

Serve hot with butter, fresh blueberries and warm syrup; and don’t forget your fuzzy slippers.  Enjoy!

Filed Under: Photo, Recipe, Recipe Modifications Tagged With: blueberry, breakfast, Dinner, Pancakes, Ricotta

Pizza – Assemble!

August 14, 2014 by Ginger 1 Comment

Pizza Buffet by D Fenwick, http://dfenwickphotography.com

Pizza Buffet

Another summer is winding down.  New school year’s are starting, gardens are in full harvest mode, and everyone seems to be squeezing out all the “staycation” exuberance they have left.  So this week, we’re highlighting the ease and playfulness of a pizza buffet.

We are lucky enough to live in time where gluten free, dairy free, and organic products are almost as easy to find as “regular” products of similar ilk.  So offering a pizza buffet to family friends is easy as assembling together all the ingredients that float your unique culinary boat (ie: tolerated, suitable, tasty, adventurous).

For our buffet we purchased pre-made gluten free pizza dough from the freezer section of our grocery store, and toppings such as:  Sheep Ricotta, Dairy Free Mozzarella, Buffalo Mozzarella, Prosciutto, Pancetta, Smoked Salmon, Pepperoni, Ham, Bell Peppers, and fresh herbs and tomatoes from our garden.  We also had berries, honey, and jam to pair with the ricotta for a pizza dessert.  You can cook your pizzas on a bbq or in the oven, however it works best for your buffet plans too!

Although we could have opted for a store bought pizza sauce, we chose to make our own, here’s the recipe we used for a quick sauce:

2 15oz cans of tomato sauce
1 6oz can of tomato paste
1 Tablespoon balsamic vinegar
2 Tablespoons honey
2-3 Tablespoons fresh chopped oregano
1 tsp salt
pepper as desired

Stir together over medium heat until just boiling then turn down and simmer until ready to use.

So use your pizza dough as a blank canvas on which you can paint your very own masterpiece of yumminess, and best of all – everyone gets to make their own leaving you just a few more dulcet moments to enjoy the pleasures of summer.


Filed Under: Photo, Recipe Tagged With: buffet, Dinner, party, pizza, pizza sauce, sauce

Beef Pot Pie

August 6, 2014 by Dan 1 Comment

Beef Pot Pie by D Fenwick, http://dfenwickphotography.com

Beef Pot Pie

Our little corner of paradise had a wonderful rainy spell lately.   So despite the fact that our normal temperatures are in the 90s, we had a hankering for pot pies.  Ideal for a stormy evening when all you want to do is snuggle down with a good book and listen to raindrops.

For the Filling:

1 1/4 lbs Beef (stew meat, roast, or what have you)
1/2 cup Flour
Salt Pepper

1 can diced Tomatoes
1 cup Red Wine
1 cup Beef Stock
1/2 medium onion
2 white Sweet Potatoes (about the size of a baking potato)
1/2 teaspoon Salt
1/2 teaspoon Pepper
1 teaspoon Cinnamon
few sprigs of fresh Thyme
2 leaves fresh Sage

12 oz. cut Green Beans (fresh or frozen)

For the Pastry:

2 cups Flour
2 sticks Butter
1 teaspoon Salt
2 eggs
1 tablespoon ice water

4 medium ramicans or other containers for baking your pot pies.

Combine 1/2 cup flour, some salt and pepper in a large ziplock bag. Cut your beef into small bite sized pieces and place in the zip lock back with the flour. Seal and shake to coat the beef evenly.

Heat a little oil in a medium sized pan, over medium heat. When the oil is hot, remove the beef from the bag, shaking off any excess flour, and place into the pan. Brown over medium heat, stirring occasionally, until browned on all sides.

While the beef is cooking, slice half of a medium onion.

When the beef is browned, add the onion, canned tomatoes, red wine, salt, pepper, cinnamon, thyme and sage to the pan, stir well and let cook over medium low or medium heat for 20 to 30 minutes.

While this is cooking, we’ll make the pastry. In your food processor, combine the flour, salt and butter and pulse until it forms pea sized pieces. Lightly beat 1 egg and add to the food processor, pulse until it is well blended in. Add about 1 tablespoon of ice water and pulse. The dough should form a ball in the food processor. If it’s too dry, add a little more ice water. (Not this dough is wet and somewhat sticky.) Form the dough into a ball and kneed for a few minutes. Cut the dough into 4 evenly sized pieces. Flour a board and roll the dough out until each piece is larger in diameter than your baking dishes for the pot pies. (You can set the pieces aside separated by parchment if you wish.)

Beat your remaining egg.

Heat your oven to 350 degrees F.

When the filling has cooked, remove from heat and add the green beans. Split the filling evenly amongst your 4 ramicans.  Tip: don’t over fill!   Using a pastry brush, brush egg around the top-outside of your baking dish and place the pastry on top. Fold over the edges and press down. The egg will seal the pastry to the top of the baking dish. Repeat for each baking dish. Make a small slit in the top of each pot pie to release the steam during baking. Brush the top of each pie with beaten egg so it browns up.  Optional: You can sprinkle a little kosher salt on top too.

Place your pot piece on the middle rack in your oven and cook for 30 to 40 minutes or until golden brown on top. Remove from the oven and let cool for a few minutes, serve hot.

For variations, feel free to use regular potatoes instead of sweet, add or substitute whatever vegetables you prefer and if you don’t like to cook with wine, substitute a second cup of beef stock, or 1/2 cup of beef stock and a small can of tomato sauce.

Enjoy!

Filed Under: Photo, Recipe Tagged With: beef, Dinner, pot pie

Recent Posts

  • Hard Cider Brittle
  • Jalapeno Artichoke Dip
  • Beef and Pasta in Red Sauce
  • Steak – One Pan Meal
  • Grain Free “Strawberry Shortcake” Cookies
  • Meatballs with options for everyone at your party
  • Chicken for game day
  • Spaghetti with sliced beef
  • Baked Salmon in Puff Pastry
  • Christmas Dessert for Two

ARCHIVES

  • November 2016
  • June 2016
  • May 2016
  • March 2016
  • February 2016
  • January 2016
  • December 2015
  • November 2015
  • October 2015
  • September 2015
  • August 2015
  • July 2015
  • June 2015
  • May 2015
  • April 2015
  • March 2015
  • February 2015
  • January 2015
  • December 2014
  • November 2014
  • October 2014
  • September 2014
  • August 2014
  • July 2014
  • June 2014
  • May 2014
  • April 2014
  • March 2014
  • February 2014
  • January 2014
  • December 2013
  • November 2013
  • October 2013

Categories

  • Cooking Information
  • Event
  • Photo
  • Recipe
  • Recipe Modifications
  • Restaurant

Meta

  • Log in
  • Entries feed
  • Comments feed
  • WordPress.org

Copyright © 2025 · Foodie Child Theme by Shay Bocks · Built on the Genesis Framework · Powered by WordPress