Adventures in Thyme

Our adventures in food

  • Home
  • Contact

Chicken for game day

February 4, 2016 by Dan Leave a Comment

Chicken


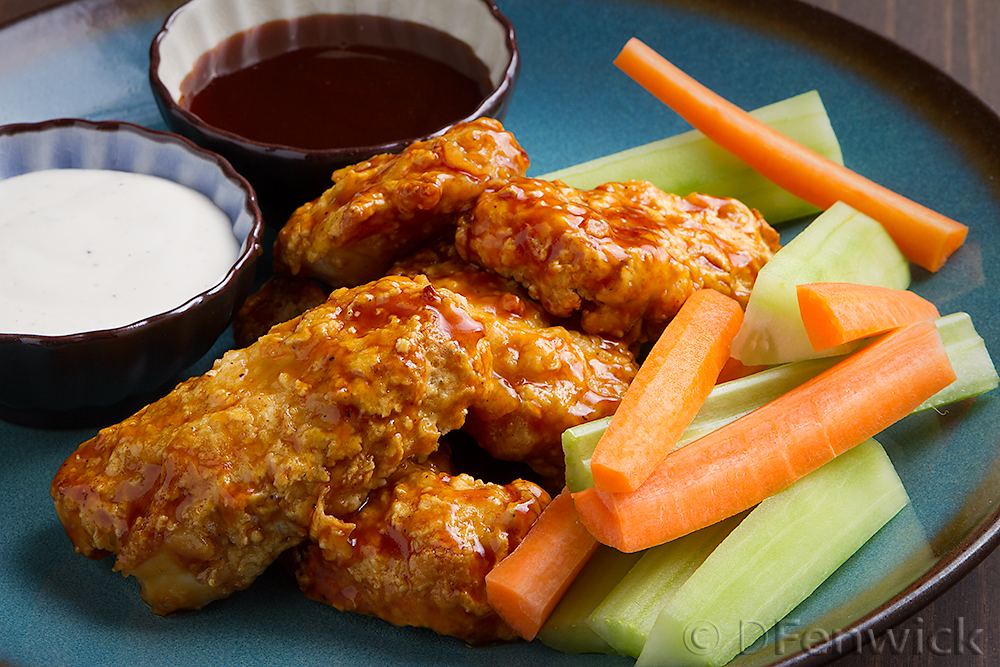
Sports and hot wings are almost a cultural obsession.  Our house doesn’t really warm up to either – don’t hate us!  But dipping chicken (and veggie) into a condiment of choice DOES appeal to our foodie nature.  So, if you want chicken for game day but want something a bit healthier than wings – here you go. Chicken breast strips breaded and baked.

Let’s get cooking!

Ingredients

1/2 cup Corn Starch
3/4 cup Corn Starch
1 cup Flour
5 Eggs, beaten
1/2 cup fresh grated Pecorino Cheese
1 teaspoon salt
1 teaspoon pepper
3 or 4 large chicken breasts

Preheat your oven to 425 degree F. Line a large baking sheet with aluminum foil and place a good sized cooling rack om the baking sheet.

Put 1/2 cup corn starch into a large zip lock bag. Place 3/4 cup corn starch, flour, grated pecorino cheese and salt and pepper into another large zip lock bag and shake to mix well. Beat all 5 eggs in a wide shallow bowl.

Wash chicken and pat dry with a paper towel. Cut the chicken breasts into 1/2 inch thick pieces, something close to the size of chicken wings.

Place a few pieces of chicken in the bag of corn starch. Shake to coat evenly. Remove from the corn starch and shake off the excess. Place the chicken in the egg and coat evenly. Place the chicken in the second bag with the flour mixture and shake to cover well. Remove the chicken from the flour and dip in the egg again. Place on the rack on your baking sheet. Repeat until all the chicken is coated.

Bake at 425 for 20 to 30 minutes, until golden grown and the chicken is cooked through. Remove from the rack and place in a bowl, a few pieces at a time. Toss with your favorite wing sauce, I used teriyaki. Serve with strips of carrot and celery or whatever vegetables you prefer. Add some extra dipping sauces and your set for the big game- or a quiet evening at home, as the case may be.  🙂

Filed Under: Photo, Recipe Tagged With: baked, breaded, chicken, Dinner, lunch, snap

Crockpot Baked Beans

December 10, 2015 by Dan Leave a Comment

Crockpot Baked Beans

Crockpot Baked Beans

This week, lets bring a bit of summer indoors. These baked beans taste great, make your house smell wonderful and are good addition to your own dinner or a holiday potluck party.

2 pounds Navy or Great Northern Beans
1 teaspoon Baking Soda
28 oz (2 12 oz bottles) Hard Apple Cider
1/2 pound Bacon, cut into small pieces
1/2 Shallot, chopped
1 cup dark Molasses
1 cup dark brown Sugar
1/4 cup Maple Syrup
1/3 to 1/2 cup good Balsamic Vinegar
2 teaspoons Worcestershire Sauce
1/2 teaspoon Paprika
1 teaspoon granulated Garlic
2 teaspoons Salt
1 teaspoon Black Pepper
1 teaspoon Mustard Powder
3 cups hot Water

Place your beans in a large pot, add the baking soda and enough water to cover by a couple of inches. Bring to a boil and boil 5 minutes or so. Turn off the heat and let the beans stand for an hour or two. Drain the beans.

Add the beans and all of the other ingredients to your crockpot. Cook for 10 to 12 hours. For this set to High for 4 to 6 hours, then turn down to low for the remainder of the time. Stir periodically if you’re home. you can also cook these over night, just set to low, stir in the morning and off and on during the day so they don’t stick or burn to the bottom of the crock.

Add salt and pepper to taste.

Enjoy!

Filed Under: Photo, Recipe Tagged With: Bacon, Baked Beans, beans, brown sugar, Crockpot, Dinner, lunch, maple, molasses, pot luck, slow cooker

Spring Rolls

June 3, 2015 by Ginger Leave a Comment

Thai Spring Rolls by D Fenwick, http://dfenwickphotography.com

Thai Spring Rolls

I have three little nieces that I love to get into mischief with.  This summer we are taking a trip to exotic cultures (from the safety of the house) with a little belly dancing, a little cheesemaking (Paneer), and a Thai Spring Roll buffet.  So this recipe was really my test to see if I could come up with a simple lunch that could cater to everyone’s likes/dislikes – and these rolls are perfect!  I can slice a variety of fresh veggies, some protein options and each of them can create their culinary masterpieces.  Woot!

The recipe, such that it is, is basically what you want to eat in a spring roll.  Here’s what I used:

Spring roll wrappers (these look like sheets of round paper, Asian products at the grocery store)
Chicken (I used roasted chicken from Costco)
Carrots – sliced
Bean Sprouts – sliced
Green Onions – sliced
Mushrooms – sliced
Fresh Cilantro
Optional: Sesame Oil
Dipping Sauce.  A peanut sauce is pictured but there are many alternatives for those with nut allergies
Tip: Slice the veggies thinly, and about the length of your thumb, they will fit into the roll better after it’s folded

Assembly

The spring roll sheets should be placed individually into a bowl of cold water for about 25 seconds then remove and shake off the excess liquid.  Quickly place some of each of the ingredients and roll once, fold the sides in then complete rolling the rice sheet.

There you have it!  They are so delicious!


Filed Under: Photo, Recipe Tagged With: Dinner, lunch, Spring Rolls, Thai, Vegetable

Non-dairy Creamy Chicken and Wild Rice Soup

May 15, 2015 by Ginger Leave a Comment

Chicken Soup by D Fenwick, http://dfenwickphotography.com

Chicken Soup

Our Spring weather has been decidedly cold, wet and snowy lately – the perfect time to try a non-dairy version of an old favorite so everyone in the house could enjoy it!

This recipe takes a little extra time, making it on a weekend is best, but it has made wonderful meals I could take to work or reheat in the microwave when I didn’t feel like cooking again.

Ingredients

1 Idaho Potato
1 Quart Organic Chicken Broth
6 Organic Chicken Thighs*
1 Celery Stalk sliced
10 Baby Carrots sliced
1 Shallot finely diced
1 Cup wild rice mix
1/2 Tsp dried Savory
1/2 Tsp dried Thyme
1 tsp salt
2 Cups Almond Milk (plain, unsweetened)
Optional: Cilantro garnish

* I chose organic meat (and bone in) chicken thighs so I could get the most bang for my buck – “bone broth”.  You might have memories of a beloved auntie or grandmother that always cooked soup with bones added in, I do, and the health benefits FAR exceed the time it takes to use and dispose of them.

Into a large cooking pot add the broth, celery, carrots, shallot, savory, thyme and salt and turn heat to medium high.  On a cutting board I removed the chicken meat from the bone and diced into bite size pieces – add everything to the pot.  Don’t worry about any remaining meat on the bones.  Bones are added right into the pot with the chicken and during the cooking process will either cook off the bones or your can easily remove the meat with a spoon.  Bring the pot to a boil then reduce to a simmer.

About 45 mins or an hour before you intend to eat, peel and dice your potato and add to a small pot with just enough water to cover the potatoes.  Turn the heat to high and bring to a boil then reduce to medium (or just enough so it doesn’t boil over).  As the water boils off, keep adding a bit more so the potato is always covered, and until the potato pieces are tender.  Remove from heat and in the same little pot (don’t pour off the water) mash the potato well and add into your chicken soup.

At the same time you put your potato to boil add the cup of wild rice mix to your chicken soup.  As the potato cooks, so will the rice and they will get done at approximately the same time.  After the potato is added to the soup pour two cups of almond milk into the soup and increase the heat to medium.  Once the soup is back to a gentle boil, reduce heat and serve.

This recipe is non dairy but you can easily add a pat of butter to your bowl if you need that “mouth feel” and aren’t allergic.

Enjoy!


Filed Under: Photo, Recipe Tagged With: almond milk, chicken, creamy, Dinner, lunch, soup, wild rice

Simple Soup with Wontons

February 11, 2015 by Ginger Leave a Comment


Won Tons and Won Ton Soup, photo by D Fenwick, http://dfenwickphotography.com

Won Tons and Won Ton Soup

Once upon a time I found myself standing next to a cooking pot with a carrot that I’d made out of construction paper.  The pot was surrounded by other hungry villagers (aka my fellow Kindergarteners) each holding their own paper vegetable and peering into the pot atop a fake firepit.  My teacher placed a stone in the cooking pot and we each added our humble offering.  She stirred it lovingly and soon after we “ate” of its riches.  It was a wonderful lesson about sharing, and how wonderful soup is – real or imagined!

Tonight I’m sharing a very simple soup, easily thrown together with whatever you might have in your fridge’s veggie bin.

Soup:
1 32oz container of Chicken Stock
Baby Bok Choy
sliced Mushrooms
sliced Green Onion (Scallions)

Wontons:
1 lb ground Pork (not sausage, you want unseasoned)
4 teaspoons Soy Sauce
1 teaspoon freshly grated Ginger
2 oz diced Water Chestnuts
1 stalk Green Onion sliced
2 teaspoons Sesame Oil
1 teaspoon Salt
1 package of square Wonton Skins
1 beaten Egg

Pour chicken stock into a pot and bring to a simmer.  While the stock is heating up mix together all the wonton ingredients EXCEPT the last two.

There are two tips I would offer when working with wonton skins, work quickly, and keep them damp.  What I mean by that is keep a slightly damp papertowel over the package of unused wonton skins while you work, and a damp papertowel over the completed wontons.

With clean hands remove a few wonton skins from the package and arrange on clean cutting board.  Carefully dip your finger into the beaten egg and draw around the outside edge of each wonton (a finger’s width).  The egg will be the binding that seals your wonton.  Place a generous teaspoon into the center of each skin and carefully fold the wonton in half (into a triangle).  It is very important to gently squeeze out the air as you seal each skin.  If you make a mistake and the seal isn’t so good, or you’ve overstuffed them, etc, place these “mistakes” to the side, we will get to those later…

Once your wontons are sealed and ready, carefully place into the simmering broth.  About 5 mins into the cooking time add your vegetables (carrots take longer – but it’s up to you what vegetable and how cooked you want them).  For my bok choy, onions and mushrooms, I cooked an additional 5 mins for a total cooking time of 10 mins.  (If you are at all worried about your wontons, remove one and cut in half, if the juice runs out clear from the meat, they are done.)

Ladle the broth, veggies and a few wontons into a bowl and you’ve got yourself a quick and fabulous little bit o’soupy heaven.

So let’s move on to those wontons that didn’t quite make the cut.  Heat your oven to 375 degrees F, and on a nonstick baking mat, or parchment paper, arrange your wontons so they don’t touch.  Spray each wonton (both sides) with a little bit of cooking spray so they will crisp as they bake.  In my convection oven it took about 20 mins.  Just be careful to watch that the skins don’t burn.  Again, if the juices run out clear, the wontons are cooked.

These crunchy dumplings need sauce, so below is a dipping sauce to dunk them in.  Mix all ingredients together, and enjoy eating your mistakes!  Oh go on, have another!

1 cup Soy Sauce
3 tablespoons Rice Vinegar
1 teaspoon Sesame Oil
1 sliced Green Onion
1 teaspoon of Honey
a few tablespoons of Water
optional: Hot Chili Flakes


Filed Under: Photo, Recipe Tagged With: Dinner, lunch, soup, Wontons

  • 1
  • 2
  • Next Page »

Recent Posts

  • Hard Cider Brittle
  • Jalapeno Artichoke Dip
  • Beef and Pasta in Red Sauce
  • Steak – One Pan Meal
  • Grain Free “Strawberry Shortcake” Cookies
  • Meatballs with options for everyone at your party
  • Chicken for game day
  • Spaghetti with sliced beef
  • Baked Salmon in Puff Pastry
  • Christmas Dessert for Two

ARCHIVES

  • November 2016
  • June 2016
  • May 2016
  • March 2016
  • February 2016
  • January 2016
  • December 2015
  • November 2015
  • October 2015
  • September 2015
  • August 2015
  • July 2015
  • June 2015
  • May 2015
  • April 2015
  • March 2015
  • February 2015
  • January 2015
  • December 2014
  • November 2014
  • October 2014
  • September 2014
  • August 2014
  • July 2014
  • June 2014
  • May 2014
  • April 2014
  • March 2014
  • February 2014
  • January 2014
  • December 2013
  • November 2013
  • October 2013

Categories

  • Cooking Information
  • Event
  • Photo
  • Recipe
  • Recipe Modifications
  • Restaurant

Meta

  • Log in
  • Entries feed
  • Comments feed
  • WordPress.org

Copyright © 2025 · Foodie Child Theme by Shay Bocks · Built on the Genesis Framework · Powered by WordPress