Adventures in Thyme

Our adventures in food

  • Home
  • Contact

Pumpkin Spice Cake Roll

December 1, 2015 by Dan Leave a Comment

Pumpkin Cake Roll by D Fenwick, http://dfenwickphotography.com

Pumpkin Cake Roll

This week we have a tasty, and visually attractive holiday dessert. It isn’t as difficult as you might think!

Cake:

3/4 cup Flour

1/2 teaspoon Baking Powder
1/2 teaspoon Baking Soda
1 teaspoon ground Cinnamon
1/2 teaspoon ground Cloves
1/2 teaspoon ground Ginger
1/4 teaspoon ground All Spice
1/4 teaspoon ground Nutmeg
1/4 teaspoon Salt
3 large Eggs
1 cup granulated Sugar
2/3 cup canned Pumpkin (about 1/2 off a small can)
1 cup chopped Pecans

For the Filling/Frosting:

20 to 22 oz soft white Goat Cheese, warmed to room temperature (The cheese logs from Costco are great)
2 1/2 cups powdered sugar
1 stick Butter, softened
2 teaspoons Vanilla Extract

Powdered sugar to coat a towel (used for rolling).

For the Cake:

Preheat your oven to 375 degrees F.

Grease a 12 x 16 inch sheet pan.  Line it with waxed paper then grease and flour the pan and waxed paper.

Lay out a kitchen towel larger than your sheet pan and cover liberally with powdered sugar. (It should take 1/4 to 1/3 cup of powdered sugar.)

Combine the dry ingredients, including the spices, in a small mixing bowl.

In a large mixing bowl, beat the three eggs. When light, add the granulated sugar and beat until it thickens. Add the pumpkin and beat until well combined. Add the dry ingredients 1/3 at a time, mixing well each time.

Spread the batter evenly in your sheet pan. Sprinkle with the pecans. Bake for 12 to 15 minutes. The cake should spring back when you touch it.

Remove the cake from the oven, loosen the edges with a knife and immediately turn out onto your sugar covered towel. Roll up in the towel, starting on a narrow end. Place on a wire rack and let cool completely.

While the cake cools, make your frosting (which is also your filling.) In a large mixing bowl, beat together the goat cheese, butter and powdered sugar. When well combined, beat in the vanilla. This should give an easily spreadable frosting. If it’s too stiff, you can add a little bit of milk, 1 teaspoon at a time (it won’t take much.)

Once cool, unroll your cake. Spread 1/2 of the frosting evenly over the cake. Roll the cake back up. If necessary, trim the ends so they are even. Wrap it tightly in plastic wrap and refrigerate at least an hour. Remove from the refrigerator, place on your serving dish and frost with the remaining frosting.

Slice to serve.

Filed Under: Photo, Recipe Tagged With: cake, Cake Roll, dessert, goat cheese, pumpkin, spice

Apple Tart with Goat Cheese and Honey

October 9, 2015 by Dan Leave a Comment

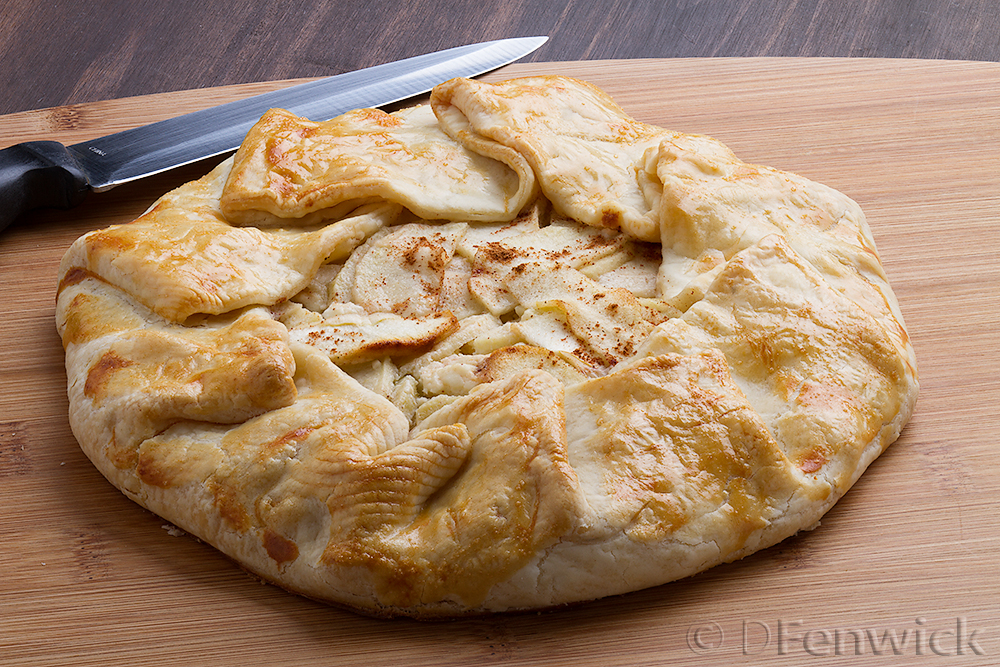
Apple tart by D Fenwick, http://dfenwickphotography.com

Apple tart with goat cheese and honey

Here in the U.S., Kurt Sutter’s The Bastard Executioner, a period drama on FX, is a few episodes into it’s 14th century epic.  An apple tart, so simple to create, and with connections to medieval cookery seemed apropos.

Enjoy!

Pie Crust for 9 inch pie
3 large tart cooking Apples (I used Granny Smiths)
8 oz soft white Goat Cheese
4 tablespoons Honey
Cinnamon
1 Egg

Preheat your oven to 350 degrees F.

Lay out two pie crusts. Spread half of the goat cheese on each piece of pie dough, leaving a couple of inches at the edge uncovered. Peel, core and slice your apples. Lay the apple slices in a decorative pattern on top of the goat cheese, half on each tart. Drizzle 2 table spoons of honey on each tart. Sprinkle with cinnamon. Now, fold the uncovered edge up and over the tart, as pictured above. Beat your egg and brush over the piece dough.

Bake 35 to 40 minutes. Remove from the oven and let cool. Serve warm or cold.

Filed Under: Photo, Recipe Tagged With: apple, dessert, goat cheese, honey, Tart

Lemon Cheesecake

December 18, 2014 by Dan Leave a Comment

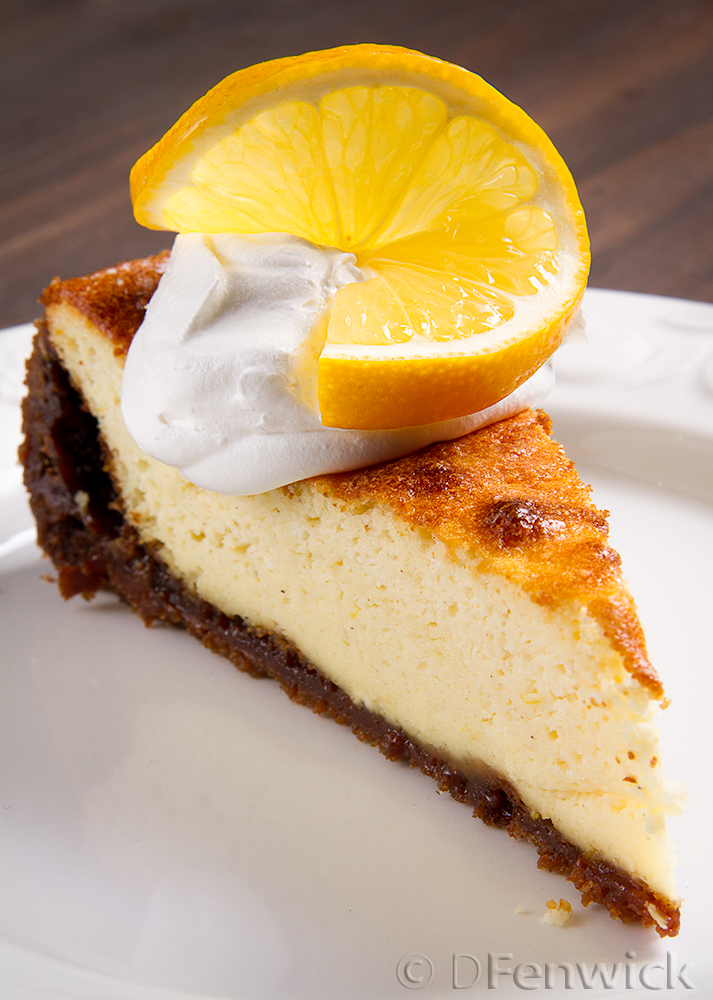
Lemon Cheesecake by D Fenwick, http://dfenwickphotography.com

Lemon Cheesecake

This week we bring you an ancient dish that is as drool worthy today, as it has been through the ages – the very decadent cheesecake!  While meandering through the fresh fruit at our local grocers some Meyer Lemons caught our attention, and somehow screamed “Cheesecake!” from their display.  Who are we to argue with citrus?!   So, whether it was serendipity, fruit fairies, or strung out holiday shoppers, please find below our inspired lemon cheese cake recipe:

Crust

13 oz. Gingersnap Cookies
1/2 cup Butter (1 stick) cut into pieces
1/2 cup Sugar
2 to 3 tablespoons Sugar for the pan

Filling

3/4 cup Sugar
16 oz. soft white Goat Cheese (Chevre)
1/2 Nutmeg grated (yes, 1/2 of a nutmeg, I grated mine with a micro plain)
3 tablespoons all purpose Flour
2 tablespoons corn starch
1/2 cup goat milk
6 egg yolks
zest of one large lemon
juice of 1/2 large lemon
6 egg whites

Preheat your oven to 350 degrees F.

Butter a 9-10 inch springform pan and dust with sugar (like you normally would flour a pan for baking).

Process the gingersnaps in a food processor until they are a course powder. Add in the butter and sugar and process until well blended. Press the mixture into the bottom of the springform pan and bake for 10 to 15 minutes. Remove from oven and let cool while you finish your filling.

Combine the sugar, cheese, vanilla, nutmeg, flour, corn starch and goat milk in a large mixing bowl. Stir to combine and break up the cheese into very small pieces. Add egg yolks one at a time and stir to blend until smooth. Set aside.

In a clean mixing bowl, beat egg whites until they form soft peaks. Be sure the bowl and beater are clean and dry or the eggs won’t beat properly.

Add the lemon zest and lemon juice to your filling and stir well. Gently fold 1/4 to 1/3 of the beaten egg whites into your filling mixture, by hand with a rubber spatula. Add another 1/4 to 1/3 and fold in, then fold in the remaining egg whites. This should make a relatively light batter. Be sure to fold in the egg whites, do not beat or mix.

Pour your filling into your springform pan and place on the center rack of your oven. Bake for approximately an hour or until the batter is mostly set. It may still be a little jiggly in the middle. Remove from the oven and gently run a butter knife around the edge of the cheesecake to loosen it from the edge of the pan.

Cool and serve with whipped cream and a slice of lemon.

Filed Under: Photo, Recipe Tagged With: cheesecake, chevre, dessert, goat cheese, goat milk, lemon

Roasted Cornish Game Hens

April 16, 2014 by Ginger 1 Comment

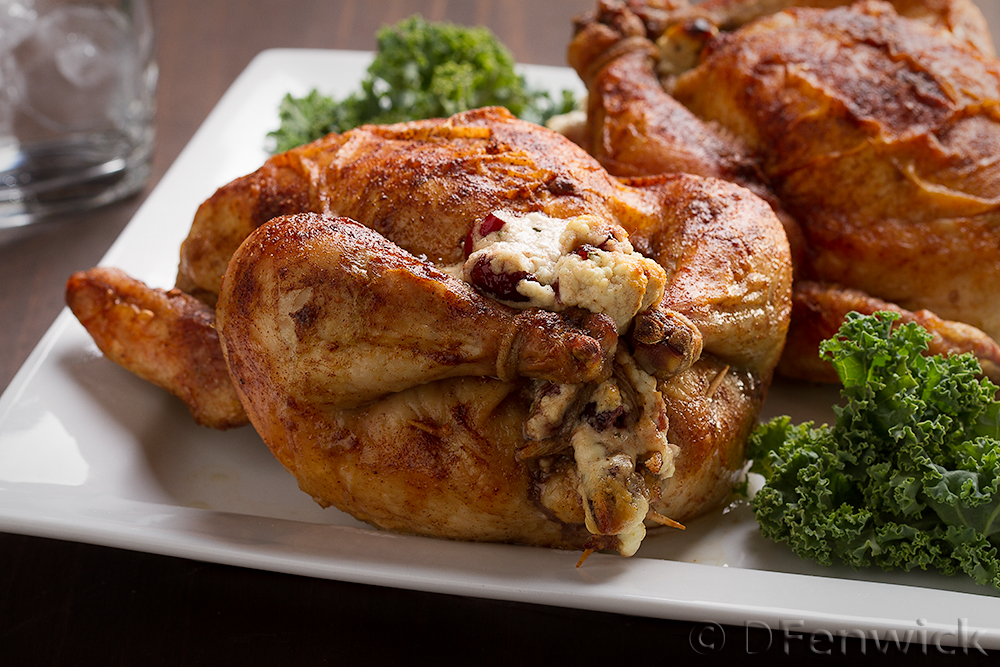
Cornish Game Hens stuffed with a cranberry and cheese stuffing by D Fenwick, http://dfenwickphotography.com

Cornish Game Hens

Perhaps today’s post will encourage you to think “outside the chicken coop” to the Cornish Game Hen.  Admittedly, this is not a wild game bird, there’s only a 50-50 chance it’s an actual hen and to be perfectly honest it’s a hybrid chicken!  Nevertheless, let’s take a trip down a culinary country lane and whip together this delicious roasted bird:

2 to 4 Cornish Game Hens

1 pound soft, white goat cheese
1/4 cup dried cranberries, chopped
2 sprigs fresh Rosemary, chopped
1/2 teaspoon Salt
1/2 Teaspoon ground Black Pepper
3/4 teaspoon Cinnamon

Seasoning:
1 tablespoon Seasoned Salt
1/2 teaspoon paprika
1/2 teaspoon cinnamon

Olive oil
tooth picks
kitchen twine

Preheat your oven to 350 degrees.
Wash and clean the game hens and pat dry with paper towels.  Pay extra attention to the cavity if you are opposed to any bits of organ meat.

To make the stuffing: combine the goat cheese, cranberries, rosemary, salt, pepper and cinnamon.  Blend gently with a fork.

The seasoning for the game hens is made by combining the seasoned salt, paprika and cinnamon in a small bowl.  Blend with a fork or your fingers.

Stuff the body cavity of each game hen with the cheese mixture.  Fill them completely.  There should be enough stuffing for 4 game hens.  Once the game hens are stuffed, use the toothpicks to hold the body cavity closed and tie the legs together with the kitchen twine.  You can use the twine to help hold the cavity closed as well.  Turn the wingtips behind the bird so they won’t burn while it is cooking.  Gently coat the game hens with olive oil and liberally sprinkle with the seasoning-salt mixture.

Place the game hens, breast up, on a cooking rack and bake for 1 1/2 hours or until a thermometer in the middle of the stuffing reads 165 degrees.  Let the game hens rest for about 15 minutes and serve.

If the game hens are very small, you can serve one per person.  If they are larger, cut them in half and serve half a game hen per person.

Note:  When handling poultry, be sure to wash your hands often and discard any partially used ingredients that might have been touched after you have touched the poultry without washing.  Be sure to thoroughly wash your cutting boards and any utensils used with the raw poulty.  We use a clorox solution for extra peace of mind.


Filed Under: Photo, Recipe Tagged With: cheese, Cornish Game Hen, cranberry, Dinner, goat cheese, Roasted, stuffing

Pumpkin Goat-Cheesecake

December 4, 2013 by Dan Leave a Comment

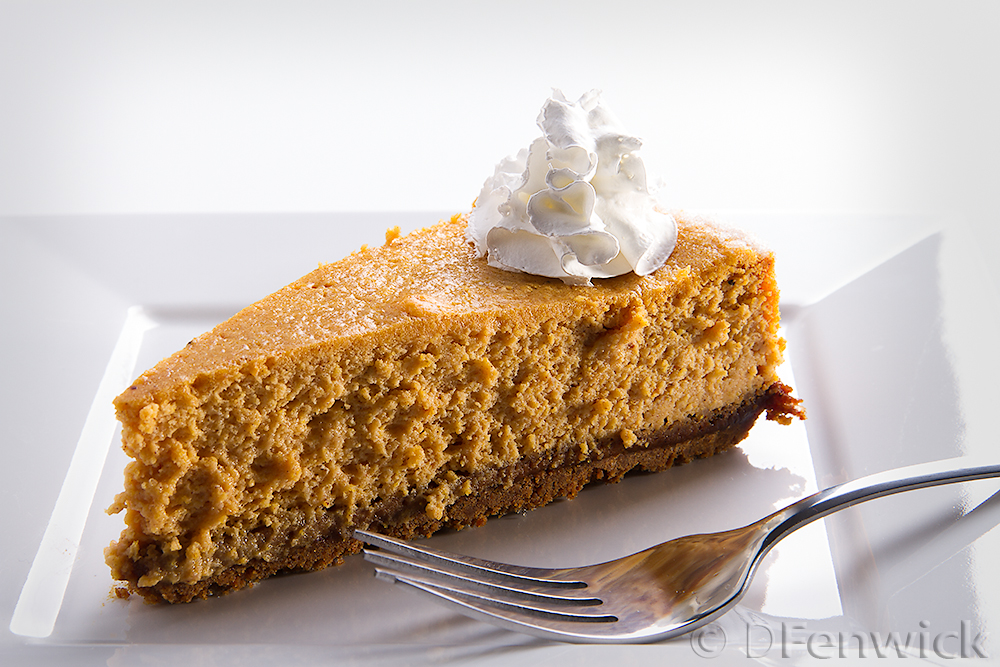
Pumpkin Cheesecake

Pumpkin Cheesecake

For those willing to broaden their culinary horizon, we present to you a cheesecake made from goat cheese.    Indeed, some turn up their noses at the thought of goat cheese, but that earthy tang so often found in goat milk products is not so pronounced when blended into this delicious cheesecake.  Oh, and we have gingersnaps, did we mention that?

Here is the recipe we served at Thanksgiving.

Crust

10 oz. gingersnap cookies (I like the ones from World Market)
2-4 T softened butter
2 or 3 T sugar for pan

Filling

3/4 cup sugar
12 ounces mild, soft, white goat cheese (10 oz logs from Costco, 4 oz from the grocery store.)
1 t Vanilla extract
1/2 T cinnamon
1/2 T nutmeg
1/2 t ginger
3 tablespoons all purpose flour
1 1/2 cups pumpkin
4 egg yolks
6 egg whites

Preheat your oven to 350 degrees F.

Butter a 9-10 inch spingform pan and dust with sugar (like you normally would flour a pan for baking).

Process the gingersnaps in a food processor until they are a course powder.  Add in the butter and process until well blended.  Press the mixture into the bottom of your springform pan and bake for 10 to 15 minutes.  Remove from oven and let cool while you finish your filling.

Combine the sugar, cheese, vanilla, flour, pumpkin, spices and egg yolks in a large mixing bowl and blend together until smooth.  Set aside.

In a clean mixing bowl, beat egg whites until they form soft peaks.  Be sure the bowl and beater are clean and dry or the eggs won’t beat properly.

Gently fold 1/4 to 1/3 of the beaten egg whites into your filling mixture, by hand with a rubber spatula.  Add another 1/4 to 1/3 and fold in, then fold in the remaining egg whites.  This should make a relatively light batter.  Be sure to fold in the egg whites, do not beat or mix.

Pour your filling into your springform pan and place on the center rack of your oven.  Bake for approximately an hour or until the batter is mostly set.  It will still be a little jiggly in the middle.  Remove from the oven and gently run a butter knife around the edge of the cheesecake to loosen it from the edge of the pan.

Cool and serve with whipped cream.

Try it out and let us know how you did, or better yet, if you were able to trick your family into trying something new.

Filed Under: Photo, Recipe Tagged With: cheesecake, dessert, goat cheese, pumpkin, recipe

Recent Posts

  • Hard Cider Brittle
  • Jalapeno Artichoke Dip
  • Beef and Pasta in Red Sauce
  • Steak – One Pan Meal
  • Grain Free “Strawberry Shortcake” Cookies
  • Meatballs with options for everyone at your party
  • Chicken for game day
  • Spaghetti with sliced beef
  • Baked Salmon in Puff Pastry
  • Christmas Dessert for Two

ARCHIVES

  • November 2016
  • June 2016
  • May 2016
  • March 2016
  • February 2016
  • January 2016
  • December 2015
  • November 2015
  • October 2015
  • September 2015
  • August 2015
  • July 2015
  • June 2015
  • May 2015
  • April 2015
  • March 2015
  • February 2015
  • January 2015
  • December 2014
  • November 2014
  • October 2014
  • September 2014
  • August 2014
  • July 2014
  • June 2014
  • May 2014
  • April 2014
  • March 2014
  • February 2014
  • January 2014
  • December 2013
  • November 2013
  • October 2013

Categories

  • Cooking Information
  • Event
  • Photo
  • Recipe
  • Recipe Modifications
  • Restaurant

Meta

  • Log in
  • Entries feed
  • Comments feed
  • WordPress.org

Copyright © 2023 · Foodie Child Theme by Shay Bocks · Built on the Genesis Framework · Powered by WordPress