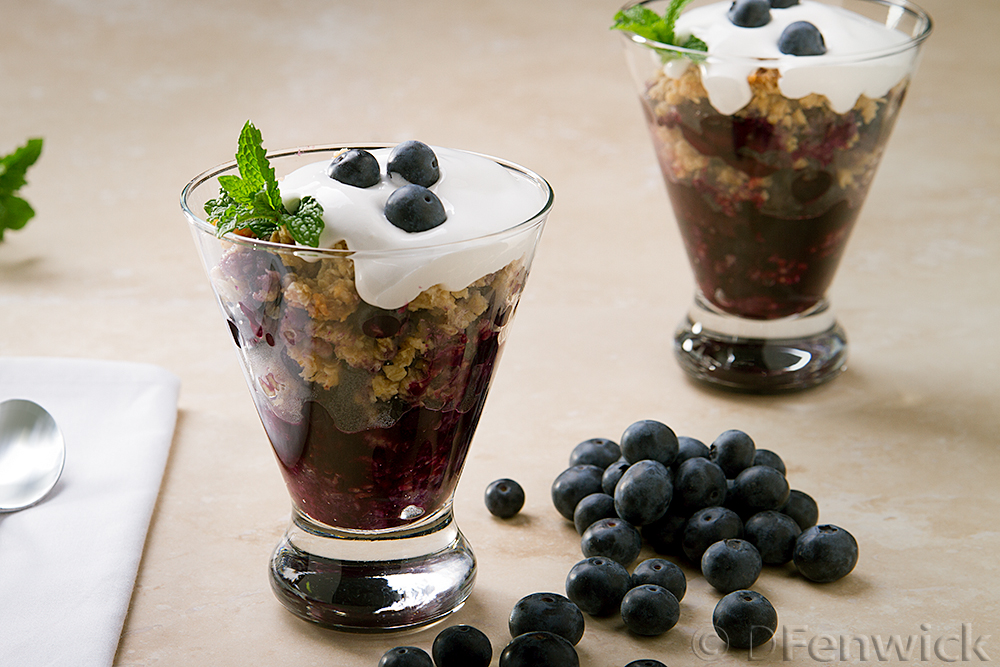
Adventures in Thyme

Our adventures in food

  • Home
  • Contact

Blueberry Crisp

May 21, 2014 by Ginger 1 Comment

Blueberry Crisp by D Fenwick, http://dfenwickphotography.com

Blueberry Crisp


Sashay through you local grocery store’s veggie section and you’ll no doubt encounter some luscious blueberries calling out your name.  Seriously, listen close – they want to go home with you!  This simple little Crisp recipe will not only provide a wonderful dessert for your next dinner party but can easily be used as a topping for your morning yogurt (if you choose not to share it with family and friends).   Depending on the ingredients you use, this versatile dish can be both vegan and gluten free, or neither.  The choice is yours.  Let’s get cooking!

Crisp filling:
~4 Cups fresh blueberries
1 meyer lemon, zested AND juiced (a “regular” lemon would work too, Meyers are just sweeter)
2 Tablespoons maple syrup

Crisp topping:
1.5 Cups of Quaker quick oats (Bob’s Red Mill sells gluten free oats if you want a substitution)
1/3 Cup extra virgin olive oil
1/2 Cup unsweetened shredded coconut
1/4 Cup coconut flour
1/4 cup coconut butter slightly melted in the microwave (you can substitute regular butter)
3 Tablespoons maple syrup
1 teaspoon real vanilla
1/2 tsp salt
1/4 tsp cinnamon
dash of ground cloves

Preheat your oven to 350 degrees F.  Mix all the filling in one bowl; mix all the topping in a different bowl.  Pour the filling into an 8×8 oven safe pan, it does not have to be “prepared” (so no oiled sides).  With clean hands, carefully crumble the topping over the filling doing your best to cover up all the blueberries.  When the oven is ready, place the pan in the oven for about 40-45 mins.  The oats will brown a bit.  If you want lighter oats, take them out sooner, if you want a crunchier top, leave it in a little longer.

It will be hard to wait it out, but give the blueberries and juices time to cool and firm up a bit.  What your first bite will tell you is, “Hey!  This isn’t super sweet, OMG I love this – it’s the perfect bite!” So go ahead and have another serving, because you’re good enough, and smart enough and doggone it – you deserve it berry much!


Filed Under: Photo, Recipe Tagged With: blueberry, Blueberry Crisp, crisp, dessert, recipe

Bacon Wrapped Smoked Pork Tenderloin Roulade

April 23, 2014 by Dan Leave a Comment

Bacon Wrapped Smoked Pork Tenderloin Roulade by D Fenwick, http://dfenwickphotography.com

Bacon Wrapped Smoked Pork Tenderloin Roulade

This week’s recipe is a scrumptious porky-extravaganza – pork wrapped in bacon.  Seriously, we’ve got “major” amounts of bacon here.  Oh and there’s cheese, tangy goat cheese in the middle.  Did you see the smoke ring?  This is one tasty treat.  Let’s get cookin’!

2 to 2 ½ pounds pork tenderloin
1 lb bacon (I prefer thick cut)
1 firm cooking apple (Granny Smiths are good)
4 to 6 oz. soft white goat cheese, at room temperature
Cinnamon
Salt
Pepper

Useful smoker tip: Be sure to prepare the wood for your smoker by soaking it in water over night.

Light the fire in your smoker so it can come to temperature while you work on the rest of the food preparations.

Cut the apple into thin slices, the thinner the better.

The pork tenderloin usually comes with two pieces in a vacuum packed package. You will take both pieces and cut them so they can be laid out flat. Do this by cutting lengthwise down the tenderloin, pulling it open and taking another cut, etc. until it has rolled out into a flat piece. (see images)

Now, lay out the two pieces of tenderloin so they roughly make a rectangle. Spread the goat cheese on the meet as shown, then lay out the apple slices as I’ve demonstrated, covering the meat completely. Sprinkle the apple with cinnamon. Add a slice of bacon on the side towards you, this is where you will start rolling up the pork loin to make the roulade.

Carefully roll up your tenderloin and temporarily tie to keep it from unrolling.  This is just to hold it in place while we do the next step.

Now lay out your bacon as shown and sprinkle with salt and pepper. Place the tenderloin on the bacon and begin wrapping the bacon slices around the tenderloin. Use a toothpick to hold the bacon in place. Remove your ties as you go, you don’t want to have someone cut into their dinner and find the string under the bacon. Wrap the entire tenderloin in bacon slices.

Once the tenderloin is wrapped up, get your kitchen twine and start tying your roulade so it will stay rolled up during cooking. A few loops of twine around the tenderloin at even intervals along its length will do fine.

Place the tenderloin in your smoker and smoke until an internal temperature of about 155 degrees is reached. (Mine took a little over 2 ½ hours). Remove the tenderloin from the smoker and carefully wrap in heavy foil, being careful not to puncture the foil with the tooth picks. Let stand for at least 15 minutes.

To serve, remove the string and slice.

Bacon Wrapped Smoked Pork Tenderloin Roulade in the Smoker by D Fenwick, http://dfenwickphotography.com

Bacon Wrapped Smoked Pork Tenderloin Roulade in the Smoker


Filed Under: Photo, Recipe Tagged With: Bacon, Dinner, Pork, recipe, Roulade, Smoked, Tenderloin, Wrapped

Beef Stroganoff over noodles

March 20, 2014 by Dan Leave a Comment

Beef Stroganoff with Noodles by D Fenwick, http://dfenwickphotography.com

Beef Stroganoff with Noodles


Beef stroganoff

1 lb beef (round steak, chuck roast, tri-tip, etc.)
1 (or more) cloves of garlic
1/2 sweet onion, thin sliced
1/2 cup flour
1 teaspoon salt
1 teaspoon ground black pepper
1 cup beef stock
1/2 cup red wine
2 Tablespoons dry sherry
6 ounces sour cream
Olive oil

Cut your beef into thin, bite sized pieces.  Combine the flour, salt and pepper in a large zip top bag.  Add the meat to the bag and seal.  Shake vigorously to evenly coat all of the meat.  (The flour will help thicken your sauce later as well as help brown the meat.)


garlic for stroganoff by D Fenwick, http://dfenwickphotography.com

garlic for stroganoff

Place 1/4 cup or so of olive oil in a skillet, heat over medium heat. Peal and slice your clove of garlic and also the sweet onion. Once the oil is hot, add the garlic to the oil. Cook until lightly browned. Remove the garlic from the oil, retaining the oil in the pan.


onions for stroganoff by D Fenwick, http://dfenwickphotography.com

onions for stroganoff

Turn the burner down to medium low and add the sliced onion.  Cook the onion until lightly browned and soft.  Add 2 Tablespoons dry sherry.  Cook, stirring frequently until well carmelized (The onions will be evenly browned.)  Remove the onions from the oil and retain the oil in the pan.


beef for stroganoff by D Fenwick, http://dfenwickphotography.com

beef for stroganoff

You may need to add a little more oil if your onions absorbed a lot of the oil you had.  Once the skillet is back up to a medium temperature, add your meat.  Cook, turning and stirring occaisionally until well browned.  Once the meat is browned, add your beef stock and red wine.  Reduce the heat to low and simmer 15 to 20 minutes.  (Cook your noodles or rice now.)  If the sauce gets too thick add a little more beef stock.


sour cream into beef stroganoff by D Fenwick, http://dfenwickphotography.com

sour cream into beef stroganoff

Once your noodles are ready and the beef is cooked add the carmelized onions to the meat and stir them.  Now add in 6 ounces of sour cream.  Add salt and pepper to taste.  Serve over noodles or rice. Sprinkle a little grated cheese over the top if desired.

For additional flavor you can add a pinch or two of rosemary along with the beef stock and wine and add the fried garlic back in when you serve the stroganoff. This photo shows the dish made with dairy free sour cream and gluten free pasta.


Filed Under: Photo, Recipe Tagged With: beef, Dinner, noodles, recipe, Stroganoff

Banana, Caramel and Ice Cream, Oh my…

February 19, 2014 by Dan Leave a Comment

Bananas and Rum Caramel over Ice Cream by D Fenwick, http://dfenwickphotography.com

Bananas and Rum Caramel over Ice Cream

1/2 Cup Brown Sugar
6 Tablespoons Butter
2 Bananas, sliced (slightly green work best)
2 Shots Rum
1 Teaspoon Vanilla

Combine the brown sugar and 4 tablespoons of butter in a skillet. Melt and bring to a boil over medium heat, stirring occasionally.  When it starts to thicken drop a little of the caramel into a glass of cold water.  It should form a soft ball of caramel in the water.  Remove from the heat and add 2 tablespoons if butter, 1 teaspoon of vanilla and 2 shots of rum.  Return to the heat and stir to combine the ingredients.  Add the sliced bananas and cook over medium heat, stirring gently, for a few minutes, until the bananas are soft, but not falling apart.

Remove from heat and let cool until warm.  Server warm over vanilla ice cream.

Filed Under: Photo, Recipe Tagged With: bananas, caramel, dessert, ice cream, recipe, rum

Bruschetta

February 5, 2014 by Ginger Leave a Comment

Cucumber and Tomato Bruschetta by D Fenwick, http://dfenwickpghotography.com

Cucumber and Tomato Bruschetta

What is it about crunchy bits of bread with a deliciously composed topping?  And I use that term loosely – a topper of aged cheddar can also be “composed” when one is fending off the munchies during the commercial break of a really good tv show!  Our humble little bruschetta is all about the tomato-cuke salad on the top, world’s greatest dressing-delivery-device ever!

Dressing:

1/4 cup Balsamic Vinegar
1/2 cup Olive Oil
2 or 3 teaspoons Honey
Sprig  Rosemary
3 or 4 Sprigs Thyme
Salt and Pepper to taste

Chop the herbs and place in a blender with the vinegar and honey.  Put the blender’s lid on and remove the hole cover in the middle of the lid.  Turn the blender on to a medium speed and slowly drizzle the olive oil into the blender.  The oil and vinegar will emulsify giving you a nice, thick dressing.  Add salt and pepper to taste.

Salad:

4 or 5 tomatoes
1 cucumber

Peel and seed the cucumber, cut into strips and then cut the strips into about 1/4 inch pieces.  Quarter and seed the tomatoes.  Cut the tomatoes into small pieces about the same size as your cucumber pieces.  Place cucumber and tomato into a bowl.  Add a little of the dressing and toss gently to coat.  Add more dressing if needed.  (Save the remaining dressing for another salad or to use as a sauce for steak.)

Bruschetta:

Baguette
1 or 2 cloves of garlic
Parmesan or Pecorino cheese

To make your Bruschetta, take a nice baguette and slice it on a slight diagonal.  Brush both sides of each slice with olive oil and then sprinkle with salt and pepper.  Gently broil the slices of bread until they are lightly toasted (you want some color and texture, not hockey pucks).  Now, peal your cloves of garlic and cut them in half.  Rub the cut side on the top of your bread.  Place the bread on a plate and top with the tomato and cucumber salad.  Top with thin pieces of Parmesan or Pecorino cheese (a peeler makes nice thin slices.)  Serve.

Oh, and if the salad doesn’t quite stay on the top of your crunchy slices, you can easily spread a little of the leftover dressing on the top so the salad will “stick” better.  Who needs leftover dressing anyway?

Filed Under: Photo, Recipe Tagged With: bruschetta, cucumber, dressing, recipe, salad, tomato

  • 1
  • 2
  • 3
  • Next Page »

Recent Posts

  • Hard Cider Brittle
  • Jalapeno Artichoke Dip
  • Beef and Pasta in Red Sauce
  • Steak – One Pan Meal
  • Grain Free “Strawberry Shortcake” Cookies
  • Meatballs with options for everyone at your party
  • Chicken for game day
  • Spaghetti with sliced beef
  • Baked Salmon in Puff Pastry
  • Christmas Dessert for Two

ARCHIVES

  • November 2016
  • June 2016
  • May 2016
  • March 2016
  • February 2016
  • January 2016
  • December 2015
  • November 2015
  • October 2015
  • September 2015
  • August 2015
  • July 2015
  • June 2015
  • May 2015
  • April 2015
  • March 2015
  • February 2015
  • January 2015
  • December 2014
  • November 2014
  • October 2014
  • September 2014
  • August 2014
  • July 2014
  • June 2014
  • May 2014
  • April 2014
  • March 2014
  • February 2014
  • January 2014
  • December 2013
  • November 2013
  • October 2013

Categories

  • Cooking Information
  • Event
  • Photo
  • Recipe
  • Recipe Modifications
  • Restaurant

Meta

  • Log in
  • Entries feed
  • Comments feed
  • WordPress.org

Copyright © 2021 · Foodie Child Theme by Shay Bocks · Built on the Genesis Framework · Powered by WordPress