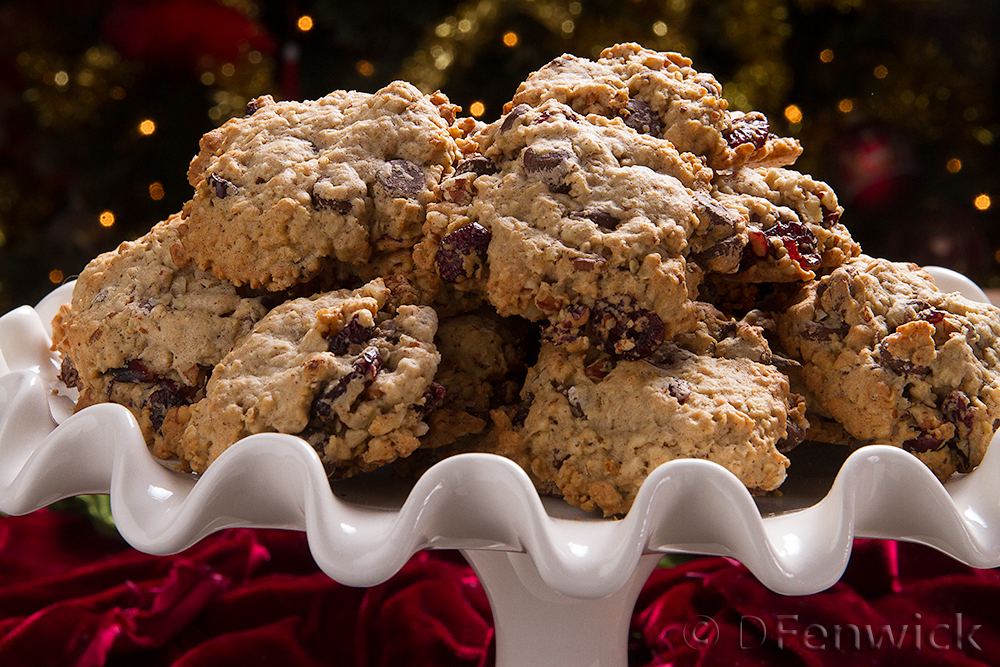
Adventures in Thyme

Our adventures in food

  • Home
  • Contact

Christmas Oatmeal Cookies

January 1, 2015 by Dan Leave a Comment

oatmeal cookies by D Fenwick, http://dfenwickphotography.com

oatmeal cookies

If you’re reading this post you’ve survived the holidays, congratulations!  We have emerged from our food comas too to share with you one of our Christmas family traditions – baking a “goodie”.  We bake lots of goodies going into the Christmas season, and this one is a favorite that combines healthy oats with dried fruits and nuts.  Oh there’s chocolate of course, what would it be without that?!

Our recipe started as Quaker Oats “Vanishing Oatmeal Raisin Cookies” recipe at http://www.quakeroats.com/cooking-and-recipe/vanishing-oatmeal-raisin-cookies.aspx ,  we tweaked it a bit to put a little tingle in your kingle.  Enjoy!

1 1/2 cups (3 sticks) Butter, softened
1 1/2 cups packed Dark Brown Sugar
1 cup Granulated Sugar
4 Eggs
2 teaspoons Real Vanilla Extract
3 cups All-purpose Flour
2 teaspoons Baking Soda
2 teaspoons Cinnamon
1 teaspoon Salt
6 cups Quick Quaker® Oats
2 cups Dried Cranberries
1 10 oz package Dark Chocolate Chips
1 12 oz package Semi-Sweet Chocolate Chips
2 cups chopped Pecans

Preheat oven to 350 degrees F.

Use your mixer to cream together the butter and sugars. Add the eggs (1 at a time) and then the vanilla. Beat until well combined.

In a separate bowl, mix well the flour, baking soda, cinnamon and salt. (You can also sift this together if you like.)

Slowly, a little at a time, add the dry ingredients to your wet ingredients. (At this point, the batch was too big for our mixer, so we had to move to a large metal mixing bowl and finish mixing by hand).

Now add the oats, cranberries, chocolate chips and pecans. Mix until evenly combined. (This part took both of us, one to hold the bowl and one to mix.)

Drop by round teaspoonsful onto an ungreased cookie sheet. Use your fingers or a spoon to press them into flat disks. These will not flatten out on their own. Bake until golden, about 8 to 10 minutes. Remove from oven and let cool on the cookie sheet for a minute or two. Move to a cooling rack and let cool.

We made just over 10 dozen small cookies with this recipe – enough to hand out for unexpected guests and of course a few to leave for Santa Claus.


Filed Under: Photo, Recipe Tagged With: chocolate, Christmas, cookie, Cookies, cranberry, dessert, oatmeal, pecan

Mincemeat Pie

December 25, 2014 by Dan Leave a Comment

mincemeat pie by D Fenwick, http://dfenwickphotography.com

mincemeat pie

It’s Christmas!  Along with lots of wonderful presents under the tree, we’d like to give you a treat for your tummy too! This is one of our Christmas desserts this year, a very easy mincemeat pie. The preparation time is relatively short and you can actually even bake it after your turkey comes out of the oven.

1 27-oz jar Mincemeat
1 to 2 red Apples, cored and chopped (1/4″ pieces are perfect)
1 cup Raisins, plumped in hot water and then squeezed of water
3/4 cup dried Cherries, chopped
1/2 cup chopped Pecans
1 teaspoon Cinnamon
1 teaspoon Nutmeg
1/2 teaspoon Ginger
1/4 teaspoon Allspice
1/4 teaspoon Clove
2 tablespoons dark Rum

1 egg beaten

Crust for a 9 inch double crust pie or two 8 inch double crust pies

Preheat your oven to 350 degrees F.

Combine the jar of mincemeat, the fruit nuts and spices and stir well. Add the rum and stir that in.

Line a 9-inch pie pan with pie dough or 2 8-inch pie pans. Fill with the filling and cover with a top crust. Crimp the edges and slit to allow steam to escape.

Beat an egg and then brush the crust with the egg. Sprinkle with sugar.

Place a cookie sheet on the lower rack to catch any juice that boils out of the pie. Bake on the middle rack of your oven about 40 minutes or until the crust is golden brown.

Serve warm or cold.

Filed Under: Photo, Recipe Tagged With: dessert, pie, pincemeat

Lemon Cheesecake

December 18, 2014 by Dan Leave a Comment

Lemon Cheesecake by D Fenwick, http://dfenwickphotography.com

Lemon Cheesecake

This week we bring you an ancient dish that is as drool worthy today, as it has been through the ages – the very decadent cheesecake!  While meandering through the fresh fruit at our local grocers some Meyer Lemons caught our attention, and somehow screamed “Cheesecake!” from their display.  Who are we to argue with citrus?!   So, whether it was serendipity, fruit fairies, or strung out holiday shoppers, please find below our inspired lemon cheese cake recipe:

Crust

13 oz. Gingersnap Cookies
1/2 cup Butter (1 stick) cut into pieces
1/2 cup Sugar
2 to 3 tablespoons Sugar for the pan

Filling

3/4 cup Sugar
16 oz. soft white Goat Cheese (Chevre)
1/2 Nutmeg grated (yes, 1/2 of a nutmeg, I grated mine with a micro plain)
3 tablespoons all purpose Flour
2 tablespoons corn starch
1/2 cup goat milk
6 egg yolks
zest of one large lemon
juice of 1/2 large lemon
6 egg whites

Preheat your oven to 350 degrees F.

Butter a 9-10 inch springform pan and dust with sugar (like you normally would flour a pan for baking).

Process the gingersnaps in a food processor until they are a course powder. Add in the butter and sugar and process until well blended. Press the mixture into the bottom of the springform pan and bake for 10 to 15 minutes. Remove from oven and let cool while you finish your filling.

Combine the sugar, cheese, vanilla, nutmeg, flour, corn starch and goat milk in a large mixing bowl. Stir to combine and break up the cheese into very small pieces. Add egg yolks one at a time and stir to blend until smooth. Set aside.

In a clean mixing bowl, beat egg whites until they form soft peaks. Be sure the bowl and beater are clean and dry or the eggs won’t beat properly.

Add the lemon zest and lemon juice to your filling and stir well. Gently fold 1/4 to 1/3 of the beaten egg whites into your filling mixture, by hand with a rubber spatula. Add another 1/4 to 1/3 and fold in, then fold in the remaining egg whites. This should make a relatively light batter. Be sure to fold in the egg whites, do not beat or mix.

Pour your filling into your springform pan and place on the center rack of your oven. Bake for approximately an hour or until the batter is mostly set. It may still be a little jiggly in the middle. Remove from the oven and gently run a butter knife around the edge of the cheesecake to loosen it from the edge of the pan.

Cool and serve with whipped cream and a slice of lemon.

Filed Under: Photo, Recipe Tagged With: cheesecake, chevre, dessert, goat cheese, goat milk, lemon

Turkey Noodle Casserole

December 5, 2014 by Dan Leave a Comment

Turkey Noodle Casserole by D Fenwick, http://dfenwickphotography.com

Turkey Noodle Casserole

With Thanksgiving behind us and Christmas on the horizon, the nagging question is: “What to do with the left over turkey?” This versatile bird can easily adapt to any occasion, even the humble leftover dinner.  Here’s a lovely dish tailor made for an overlooked drumstick or those turkey bits left behind on the serving tray.

12 oz Pasta (pick your favorite kind and cook in salted water until  still a little chewy, retain some of the water)

1/2 cup chopped Carrots
1/2 cup chopped Celery
1/2 cup chopped Onion
2 tablespoons Butter
2 tablespoons Flour
2 cups Chicken Stock
4 oz. Chevre (or other soft white cheese)
1/2 cup Sour Cream
1/2 cup water from cooking your pasta
2 cups Turkey cut into bite sized pieces
salt and pepper to taste

Butter a 9×13 baking dish and set aside. Preheat your oven to 350 degrees F.

In a large skillet melt your butter over medium low heat. When the butter is melted add the carrots, celery and onion and cook until the onion is translucent. Sprinkle 2 tablespoons of flour over the vegetables in the pan and stir to coat evenly and combine with the butter. Cook stirring gently 4 to 5 minutes. Don’t let it stick to the bottom of the pan or it will burn. Add 2 cups chicken stock a little at a time, stirring to combine well before adding more. Let this simmer for a few minutes until it starts to thicken. Add the pasta and stir well, then add the turkey, cheese and sour cream. Stir to combine well and melt the cheese. Taste the mixture at this point and add salt and pepper to taste.

Pour the mixture into your 9×13 baking dish and bake 30 to 40 minutes. The top will brown a little and the casserole will be bubbly.

For another possibility, use shredded cheddar cheese and ham in place of the chevre and turkey. Add the cheese and sour cream before the pasta and ham and stir until the cheese melts and combines with the sauce. Then add the pasta and ham. Cook as above.

Enjoy

Filed Under: Photo, Recipe Tagged With: casserole, Dinner, Noodle, Turkey

Pumpkin Pie

November 26, 2014 by Dan Leave a Comment

Pumpkin Pie by D Fenwick, http://dfenwickphotography.com

Pumpkin Pie


Tonight’s recipe is all about getting the kids to eat their vegetables.  You shouldn’t have much trouble – pumpkin pie is so deliciously silky and spiced with the  flavors of Fall – cinnamon and nutmeg.  Okay, so we’re kidding ourselves if we think it’s “healthy” but it IS a vegetable.  Let’s make some pie!

This recipe makes two deep 9 inch pies or three shallow 9 inch pies or three deep 8 inch pies.

2 cups Sugar
1 tablespoon Flour
1 1/2 teaspoons Salt
1 teaspoon ground Ginger
1 tablespoon ground Cinnamon
1 tablespoon ground Nutmeg
1 quart Milk (or substitute – almond milk, soy creamer, etc.)
1 large can Pumpkin (about 3 cups)
1 teaspoon Vanilla
3 tablespoons melted Butter
4 eggs

Pie crust for two 9 inch pies (three for shallow 9 inch or deep 8 inch pans)

Preheat your oven to 350 to 400 degrees F. (For my oven it needs to be 400.)

Mix together the dry ingredients; sugar, flour, salt, ginger, cinnamon and nutmeg.

In a large mixing bowl, beat 4 eggs. Combine the dry ingredients, pumpkin and wet ingredients by alternating their addition into a mixing bowl.  Specifically by starting and ending with dry ingredients, about a quarter of each ingredient with each addition. Stir together well as you add each part. Once the ingredients are well mixed, add the vanilla and butter.

Place your crust in the pie pans. Fill each pie with the filling, keep the filling about equal so they will cook evenly.

Cook on the middle rack of your oven until the custard is set in the middle. Start checking at about 60 minutes. On my oven it takes about 80 minutes for the deep 9 inch pies to cook.

Serve with whipped cream.

Filed Under: Photo, Recipe Tagged With: Christmas, dessert, pie, pumpkin, Pumpkin Pie, Thanksgiving

  • « Previous Page
  • 1
  • …
  • 4
  • 5
  • 6
  • 7
  • 8
  • …
  • 13
  • Next Page »

Recent Posts

  • Hard Cider Brittle
  • Jalapeno Artichoke Dip
  • Beef and Pasta in Red Sauce
  • Steak – One Pan Meal
  • Grain Free “Strawberry Shortcake” Cookies
  • Meatballs with options for everyone at your party
  • Chicken for game day
  • Spaghetti with sliced beef
  • Baked Salmon in Puff Pastry
  • Christmas Dessert for Two

ARCHIVES

  • November 2016
  • June 2016
  • May 2016
  • March 2016
  • February 2016
  • January 2016
  • December 2015
  • November 2015
  • October 2015
  • September 2015
  • August 2015
  • July 2015
  • June 2015
  • May 2015
  • April 2015
  • March 2015
  • February 2015
  • January 2015
  • December 2014
  • November 2014
  • October 2014
  • September 2014
  • August 2014
  • July 2014
  • June 2014
  • May 2014
  • April 2014
  • March 2014
  • February 2014
  • January 2014
  • December 2013
  • November 2013
  • October 2013

Categories

  • Cooking Information
  • Event
  • Photo
  • Recipe
  • Recipe Modifications
  • Restaurant

Meta

  • Log in
  • Entries feed
  • Comments feed
  • WordPress.org

Copyright © 2025 · Foodie Child Theme by Shay Bocks · Built on the Genesis Framework · Powered by WordPress