Adventures in Thyme

Our adventures in food

  • Home
  • Contact

Pumpkin Spiced Marshmallows

November 9, 2015 by Ginger Leave a Comment

Pumpkin Marshmallows by D Fenwick, http://dfenwickphotography.com

Pumpkin Marshmallows


I had to jump onto the pumpkin spice bandwagon again – if only for a brief flirtation with it’s seductive seasonal charms.  Marshmallow Madness by Shauna Sever is a great book that takes you step by step thru the marshmallow making world.  My instructions won’t give her detail justice – so be warned, and buy the book! I’ve also adjusted her pumpkin recipe slightly to make for a more personally appealing mallow.  I enjoy spices, so I cater to that.  I’ve used these marshmallows in my coffee AND layered between pancakes hot off the griddle – oh yes indeed-ie!

My secret to success was preparation.  The mallows come together really quickly so having everything prepped and ready to add was key.  Let’s get cooking!

What you’ll need:

First and foremost an electric mixer with a whisk attachment.  We’ve killed a hand-held mixer making Divinity, so be kind to your kitchen tools and just go for the larger mixer.

5 tsps. unflavored gelatin + 1/2 cup cold water
3/4 cup sugar
1/2 cup light corn syrup
1/4 cup water
1/4 tsp salt
1/3 cup canned pumpkin puree
3/4 tsp cinnamon
scant 1/4 tsp nutmeg
1 tsp vanilla extract

food coloring is optional

Dusting powder: 1/4 cup cornstarch + 1/2 cup powdered sugar + 1/4 teaspoon of pumpkin pie spice

1.)  Prep an 8×8 baking pan with your oil of choice.  I used coconut butter, but whatever your tummy can tolerate to keep the mallows from sticking will work.

2.)  In a microwave safe bowl mix the gelatin & 1/2 cup cold water well and set aside.

3.)  Into a medium sauce pan mix the sugar, 1/4 cup of corn syrup water and salt.  You’ll want to heat this to a boil and 250 degrees F.  Keep an eye on this and stir occasionally.  While this is heating, into an electric mixer bowl pour the remaining 1/4 cup corn syrup.

4.) Take the gelatin bowl from Step 2 and heat in the microwave about 20-30 seconds depending on your appliance.  You’ll want this melted.  Pour into the electric mixer’s bowl and mix with the corn syrup on low.

5.)  Last bit of prep – while the sauce pan is still heating to 250 degrees F, and your mixer is keeping the gelatin from solidifying, mix the last of your ingredients together in another bowl (pumpkin, cinnamon, nutmeg and vanilla) and set aside.

6.)  Once the heating corn syrup reaches 250 degrees F carefully add this to the mixer.  Syrup flung onto the sides of the bowl will not make for good marshmallows.  Once added to the bowl increase the speed to medium for 5 minutes, then increase to medium-high for 5 more minutes, then to high for 1 minute.  Add the pumpkin mixture, return to high speed for 1 minute of mixing.  You can add coloring at this point if you have a preference.

7.) Carefully pour the marshmallow mixture into the prepared pan, spreading it into the corners and flattening it as best as you can.  Now take your dusting powder and sprinkle all over the top.  Set aside.  Overnight is good.

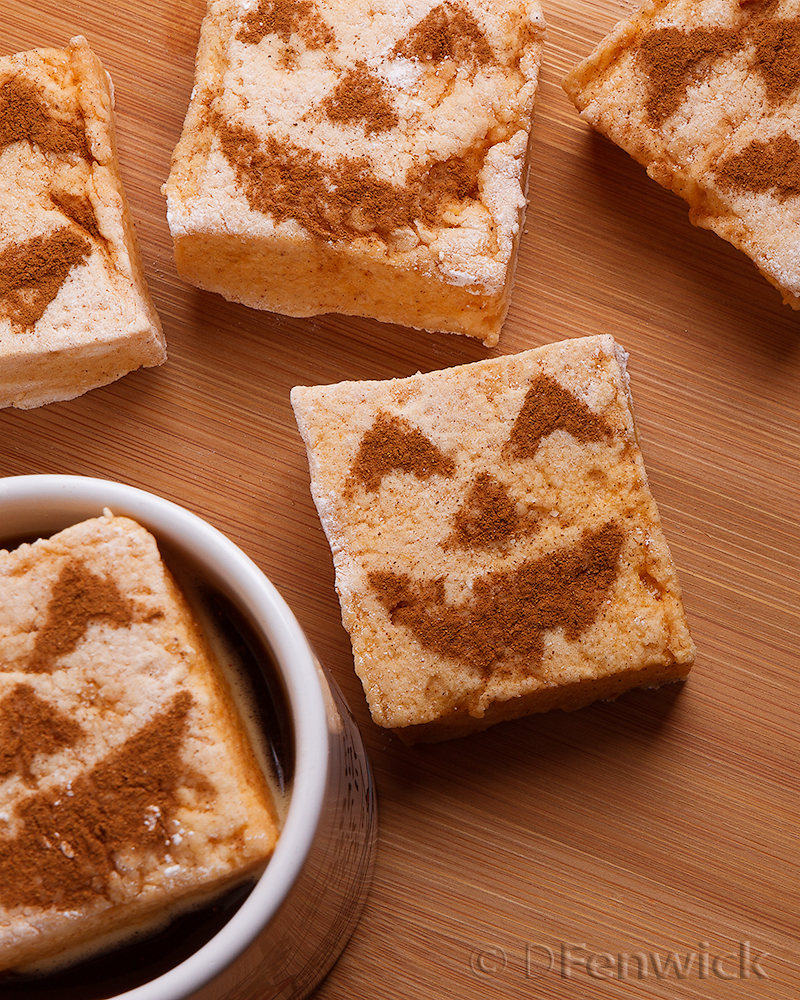
In the morning sprinkle the dusting powder onto your cutting board and layout the marshallows cutting to your preferred size.  Roll in more powder to keep them from sticking together.  We made a template of pumpkin faces and used cinnamon sugar to make the face.

Enjoy!


Filed Under: Photo, Recipe Tagged With: coffee, marshmallow, Pancakes, pumpkin, spice, Sweets

Date Bars

October 9, 2014 by Dan 1 Comment


Date Bars by D Fenwick, http://dfenwickphotography.com

Date bars


If you ever crave a crumbly and gooey dessert, this Date Bar recipe is for you.  It would be excellent paired with a scoop of vanilla bean ice cream,  and since the glaze can do double duty on the ice cream too – it’s a win win!  Let’s get cooking…

Filling

3 cups chopped dates (you can find these prepackaged in the baking aisle)
1/2 cup sugar
3/4 cup water

Combine the dates, sugar and water in a small sauce pan. Cook over low to medium low heat, stirring frequently, until it starts to thicken and is bubbly (20-25 minutes).  Remove from heat and let cool.

Dough/Crumbly bits

2 cups flour
3 cups quick cooking oats
1 1/2 cup brown sugar
1 teaspoon baking soda
1/2 teaspoon salt
1 teaspoon cinnamon
1 cup vegetable oil

Preheat your oven to 325 degrees F. Grease one 9×13 or two 9×9 baking pans. (The 9×13 makes thicker bars.)

Combine the dry ingredients, mix well. Add the oil and stir to combine. This will make a very crumbly dough.

Press 2/3 of the dough into the baking pan(s). Spread the cooled filling evenly over the top. Place the remaining dough on top of the filling and pat it down evenly.

Place on the middle rack in the oven and bake 30 to 35 minutes (25-30 for 9×9).

Remove from oven and let cool. Cut unto 2 x 2 inch bars.

Glaze

1 cup brown sugar
1/4 cup butter
1/4 cup heavy cream
1 teaspoon vanilla

Place ingredients in a sauce pan and cook over medium heat, stirring periodically. (Don’t let it stick to the bottom or burn.) Bring to a boil and boil, whisking constantly, for 3 or 4 minutes. It will thicken a bit. Let cool to warm and drizzle over the top of your date bars. Serve yourself a delectable sized portion and enjoy the fruits of your labor.

Filed Under: Photo, Recipe Tagged With: Bars, Cookies, Date, dessert, Sweets

Recent Posts

  • Hard Cider Brittle
  • Jalapeno Artichoke Dip
  • Beef and Pasta in Red Sauce
  • Steak – One Pan Meal
  • Grain Free “Strawberry Shortcake” Cookies
  • Meatballs with options for everyone at your party
  • Chicken for game day
  • Spaghetti with sliced beef
  • Baked Salmon in Puff Pastry
  • Christmas Dessert for Two

ARCHIVES

  • November 2016
  • June 2016
  • May 2016
  • March 2016
  • February 2016
  • January 2016
  • December 2015
  • November 2015
  • October 2015
  • September 2015
  • August 2015
  • July 2015
  • June 2015
  • May 2015
  • April 2015
  • March 2015
  • February 2015
  • January 2015
  • December 2014
  • November 2014
  • October 2014
  • September 2014
  • August 2014
  • July 2014
  • June 2014
  • May 2014
  • April 2014
  • March 2014
  • February 2014
  • January 2014
  • December 2013
  • November 2013
  • October 2013

Categories

  • Cooking Information
  • Event
  • Photo
  • Recipe
  • Recipe Modifications
  • Restaurant

Meta

  • Log in
  • Entries feed
  • Comments feed
  • WordPress.org

Copyright © 2022 · Foodie Child Theme by Shay Bocks · Built on the Genesis Framework · Powered by WordPress