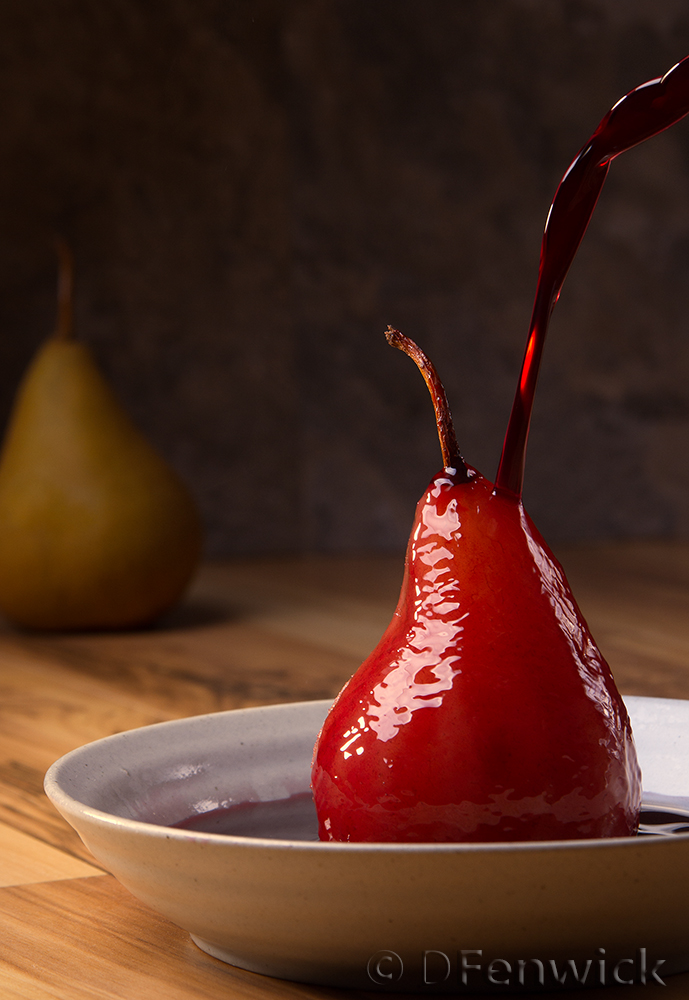
Adventures in Thyme

Our adventures in food

  • Home
  • Contact

Peeres in Confyt

October 22, 2014 by Dan 1 Comment

Pear in Wine Sauce by D Fenwick, http://dfenwickphotography.com

Pear in Wine Sauce

This week it’s another trip through time. Dan was asked to shoot a cover for the Society for Creative Anachronism’s quarterly magazine, Tournaments Illuminated. The nice people at Medieval Cookery very kindly allowed us to use the Peeres in Confyt recipe for the cover photo and have given us permission to post it here. You can find this and many other fun historical recipes on their web site at medievalcookery.com

The original recipe is from Forme of Cury, S. Pegge (ed.):

PEERES IN CONFYT. XX.VI. XII. Take peeres and pare hem clene. take gode rede wyne & mulberes oþer saundres and seeþ þe peeres þerin & whan þei buth ysode, take hem up, make a syryp of wyne greke. oþer vernage with blaunche powdour oþer white sugur and powdour gyngur & do the peres þerin. seeþ it a lytel & messe it forth.

The redaction we used is:

4 pears
3 cups red wine
water (for poaching)
2 cups sugar
1/2 tsp. ginger

Peel pears, leaving the stems on, and cut a small amount off the bottoms so they will stand upright. Poach in water flavored with one cup of wine. Remove pears from water when they are just tender and place upright in a serving bowl. If desired, slice each pear in halves or quarters leaving about a half inch from the top uncut so the parts will remain attached. Make a syrup of remaining wine, sugar, and ginger. Bring syrup to a boil, reduce heat and allow to simmer. Pour syrup over pears and serve hot.

This is really a very easy recipe and is quite good. It would be perfectly at home on the table for your holiday parties, Thanksgiving or Christmas dinner.

Explore history through food and have a little adventure in time!

Filed Under: Photo, Recipe Tagged With: dessert, medieval, pears, wine

Pasta with Lamb

October 15, 2014 by Ginger 1 Comment


Lamb Meatballs by D Fenwick, http://dfenwickphotography.com

Lamb Meatballs

Today’s dish was actually difficult to name.  When one mentions “balls” these days, the conversation can quickly disintegrate into snickering akin to Beavis and Butthead, or be misinterpreted to a recipe involving lamb testicles, better known in Nevada as “lamb fries”.  So we will simply say that this dish involves Pasta with Lamb (tho you are in fact making round balls, let’s be clear – and let the giggling begin).  If you don’t like lamb, turkey would be a good substitute.  Use your imagination!  This is exactly what it’s for, and where our adventure begins…

Ingredients:

1lb ground lamb
1lb broccoli florets – cut into small “heads” or flowers
1 clove of garlic finely minced
1 small shallot finely minced
2 eggs
1/2 cup panko (or you could use breadcrumbs)
1 tsp salt
1 tsp dried rosemary
1/2 tsp thyme
1/2 tsp basil
1/3 cup almond milk (or you could use cream)
1 cup shredded pecorino (or parmesan)
crumbled goat cheese
extra virgin olive oil
1 lb cooked pasta (we used gluten free rotini, but any small noodle will do)
Optional: red pepper flakes

To a large skilled add a couple tablespoons of olive oil.  When the oil is hot, add the minced garlic and shallot, stirring continually until the shallot begins to be translucent (6-8 minutes).  Remove from heat and empty the skillet into a large mixing bowl (save this skillet for later, you’ll use it again).   While this mixture is cooling, add the salt, rosemary, thyme and basil.  Stir well.  Next add the lamb, one egg and panko to the bowl.  With clean hands mix this well, incorporating all the ingredients together, then begin rolling your balls.  Ours are slightly bigger than bite size, whatever size you prefer is what you should aim for.  Smaller will cook faster, fyi.  I roll the balls and place them back into my mixing bowl.  Yes, I have a large bowl and prefer fewer dirty dishes to clean up!

This next phase will require some forethought and a bit of juggling.  If you have larger balls, you’ll need to finish them off in a 450 degree oven for about 20 mins, if you have smaller balls, you won’t.  Depending on how you answered that question, will determine when you should begin cooking your pasta!  If you are going to use the oven, have your pot boiling when you place the balls into the oven; if you aren’t using the oven, time the cooking of the lamb, with the cooking pasta.  Make sense? You want everything done at the same time.  So cook your pasta when you’re good n’tooting ready!

Once your balls are ready to be cooked (and with clean hands), add a couple more tablespoons of olive oil to you skillet.  When it’s hot (and the balls will sizzle) carefully add them to your pan.  Depending on the size, you’ll need to turn them every 5-6 mins to get them uniformly brown.  *If* you made larger balls, now it’s time to put them into the prepared oven, (450 degree oven for about 20 mins.  I place mine into a parchment lined pan and cover with aluminum foil).

When the balls are done, return them to your original skillet (or just leave them in there) and add your broccoli.  As the broccoli cooks it will turn a beautiful deep green.  While this cooks whisk your egg and almond milk together in a small bowl. You don’t want to fry them crispy, just about 8 mins or so, if they begin to turn brown, it’s time to move on.  Add your drained pasta, mix well remove from the heat; quickly add your egg mixture and mix constantly (yes, you will get some cooked eggie bits), then add the shredded cheese.  Serve hot with crumbled goat cheese on the top and French bread with balsamic vinegar to dip in.

If you enjoy a little heat with your meal, sprinkle on red pepper flakes to taste.


Filed Under: Photo, Recipe Tagged With: Dinner, Lamb, meatballs, pasta

Date Bars

October 9, 2014 by Dan 1 Comment


Date Bars by D Fenwick, http://dfenwickphotography.com

Date bars


If you ever crave a crumbly and gooey dessert, this Date Bar recipe is for you.  It would be excellent paired with a scoop of vanilla bean ice cream,  and since the glaze can do double duty on the ice cream too – it’s a win win!  Let’s get cooking…

Filling

3 cups chopped dates (you can find these prepackaged in the baking aisle)
1/2 cup sugar
3/4 cup water

Combine the dates, sugar and water in a small sauce pan. Cook over low to medium low heat, stirring frequently, until it starts to thicken and is bubbly (20-25 minutes).  Remove from heat and let cool.

Dough/Crumbly bits

2 cups flour
3 cups quick cooking oats
1 1/2 cup brown sugar
1 teaspoon baking soda
1/2 teaspoon salt
1 teaspoon cinnamon
1 cup vegetable oil

Preheat your oven to 325 degrees F. Grease one 9×13 or two 9×9 baking pans. (The 9×13 makes thicker bars.)

Combine the dry ingredients, mix well. Add the oil and stir to combine. This will make a very crumbly dough.

Press 2/3 of the dough into the baking pan(s). Spread the cooled filling evenly over the top. Place the remaining dough on top of the filling and pat it down evenly.

Place on the middle rack in the oven and bake 30 to 35 minutes (25-30 for 9×9).

Remove from oven and let cool. Cut unto 2 x 2 inch bars.

Glaze

1 cup brown sugar
1/4 cup butter
1/4 cup heavy cream
1 teaspoon vanilla

Place ingredients in a sauce pan and cook over medium heat, stirring periodically. (Don’t let it stick to the bottom or burn.) Bring to a boil and boil, whisking constantly, for 3 or 4 minutes. It will thicken a bit. Let cool to warm and drizzle over the top of your date bars. Serve yourself a delectable sized portion and enjoy the fruits of your labor.

Filed Under: Photo, Recipe Tagged With: Bars, Cookies, Date, dessert, Sweets

Tartys In Applis

October 1, 2014 by Dan Leave a Comment

Tartys In Applis

Tartys In Applis

This week we’re going to tiptoe through time to days of yore for a yummy “Tartys In Applis”.

For To Make Tartys In Applis. Tak gode Applys and gode Spycis and Figys and reysons and Perys and wan they are wel ybrayed colourd wyth Safroun wel and do yt in a cofyn and do yt forth to bake wel. Source – Form od Cury, English 14th century.  (Try http://medieval cookery.com or google search for sites with assorted redactions.  This is a modification of the one on Medieval Cookery)

 How’d you do?  Get it?  No worries, back to the future we go…

5 cups chopped apples
1 cup chopped figs
½ cup raisins
1 tablespoon sugar
2 teaspoons cinnamon
½ teaspoon ginger
½ teaspoon nutmeg
¼ teaspoon cloves
2 crusts for a 9 inch pie
1 beaten egg (to brush crust)

Preheat your oven to 350 degrees.

Peel, core and dice the apples. I used a mix of sweet and tart apples.  Chop figs too.  Combine the apples, figs and raisins.  Add the sugar and spices mixing well.

Lay out your pie crusts on a parchment paper covered baking sheet. Put half the mixture on each pie crust, leaving an inch to an inch and a half clear around the circumference.  Spread the filling so it is level.  Fold the edges of the crust up and over the edge of the filling.  Add apple slices to make a decorative pattern if you wish.

Brush the crust with beaten egg. Bake for 40 minutes or until golden brown.  Serve warm or cold.

Changes from the original; I left out the pears, as I have lots of apples on my tree. I also left out the saffron as it isn’t going to do much to color this without more liquid.

Filed Under: Photo, Recipe Tagged With: 14th century, apple, dessert, Tart, Tartys In Applis

Tagine Tikka Masala

September 25, 2014 by Ginger Leave a Comment

Chicken Tikka Masala by D Fenwick, http://dfenwickphotography.com

Chicken Tikka Masala


I’m still obsessing over the lovely tagine my husband gave me for our anniversary.   Converting recipes over to cook has infused new life (and flavors) into our meal rotations.   This dish worked very well for a meal that could cook slowly on a back burner while I worked on other endeavors.  My inspiration for this recipe comes from Rachael Ray’s latest magazine, so please consider this a tagine makeover of her simple and inspired recipe.  (The original dish is a 30 minute meal, but I made mine in the early afternoon to bubble happily away on the stovetop until we were ready to eat later.)

Ingredients:

pat of butter
1 Tablespoon of garlic infused olive oil (but extra virgin olive oil will work too)
3 cloves of garlic, finely chopped
2 inches of fresh ginger, peeled and shredded on a microplane grader (chopping finely works too)
1 small shallot finely chopped
1 sweet potato, peeled & cubed
1 – 2 lbs of boneless chicken thighs, cubed  (depending on how many people you are feeding!)
1 – 2 cans of fire roasted tomatoes (depending on how many people you are feeding!)
1 teaspoon garam masala
1/2 teaspoon smoked paprika
2/3 cup heavy cream
1 10 oz bag of frozen peas, thawed

optional: jalapenos, finely chopped
optional: shelled edamame, cooked (I used a 12 oz bag)
optional: rice (this recipe has potatoes in it, but if you want rice too – go for it!)
optional garnish: slivered almonds, cilantro

In your tagine (or pot), heat the olive oil and butter over medium heat; add cloves, ginger, jalapenos, and shallot and stir until shallots are translucent (about 5 mins).  Add garam masala & paprika stirring quickly to incorporate the spices throughout the oil mixture.  Add the cubed chicken and mix well; then add tomatoes and cream.  Once the dish begins to bubble, cover and turn down to medium low.  About 30 mins before you intend on eating add the cubed potatoes, then add the peas about 10 mins prior to serving.  Although not pictured, I love edamame, so my bowl included about 1/4 cup of precooked edamame.

Serve over rice, or with a slice of naan, and garnish as pictured.  Enjoy!

Filed Under: Photo, Recipe Modifications Tagged With: chicken, Tagine, tikka masala

  • « Previous Page
  • 1
  • …
  • 11
  • 12
  • 13
  • 14
  • 15
  • …
  • 23
  • Next Page »

Recent Posts

  • Hard Cider Brittle
  • Jalapeno Artichoke Dip
  • Beef and Pasta in Red Sauce
  • Steak – One Pan Meal
  • Grain Free “Strawberry Shortcake” Cookies
  • Meatballs with options for everyone at your party
  • Chicken for game day
  • Spaghetti with sliced beef
  • Baked Salmon in Puff Pastry
  • Christmas Dessert for Two

ARCHIVES

  • November 2016
  • June 2016
  • May 2016
  • March 2016
  • February 2016
  • January 2016
  • December 2015
  • November 2015
  • October 2015
  • September 2015
  • August 2015
  • July 2015
  • June 2015
  • May 2015
  • April 2015
  • March 2015
  • February 2015
  • January 2015
  • December 2014
  • November 2014
  • October 2014
  • September 2014
  • August 2014
  • July 2014
  • June 2014
  • May 2014
  • April 2014
  • March 2014
  • February 2014
  • January 2014
  • December 2013
  • November 2013
  • October 2013

Categories

  • Cooking Information
  • Event
  • Photo
  • Recipe
  • Recipe Modifications
  • Restaurant

Meta

  • Log in
  • Entries feed
  • Comments feed
  • WordPress.org

Copyright © 2025 · Foodie Child Theme by Shay Bocks · Built on the Genesis Framework · Powered by WordPress