Adventures in Thyme

Our adventures in food

  • Home
  • Contact

Roasted Cornish Game Hens

April 16, 2014 by Ginger 1 Comment

Cornish Game Hens stuffed with a cranberry and cheese stuffing by D Fenwick, http://dfenwickphotography.com

Cornish Game Hens

Perhaps today’s post will encourage you to think “outside the chicken coop” to the Cornish Game Hen.  Admittedly, this is not a wild game bird, there’s only a 50-50 chance it’s an actual hen and to be perfectly honest it’s a hybrid chicken!  Nevertheless, let’s take a trip down a culinary country lane and whip together this delicious roasted bird:

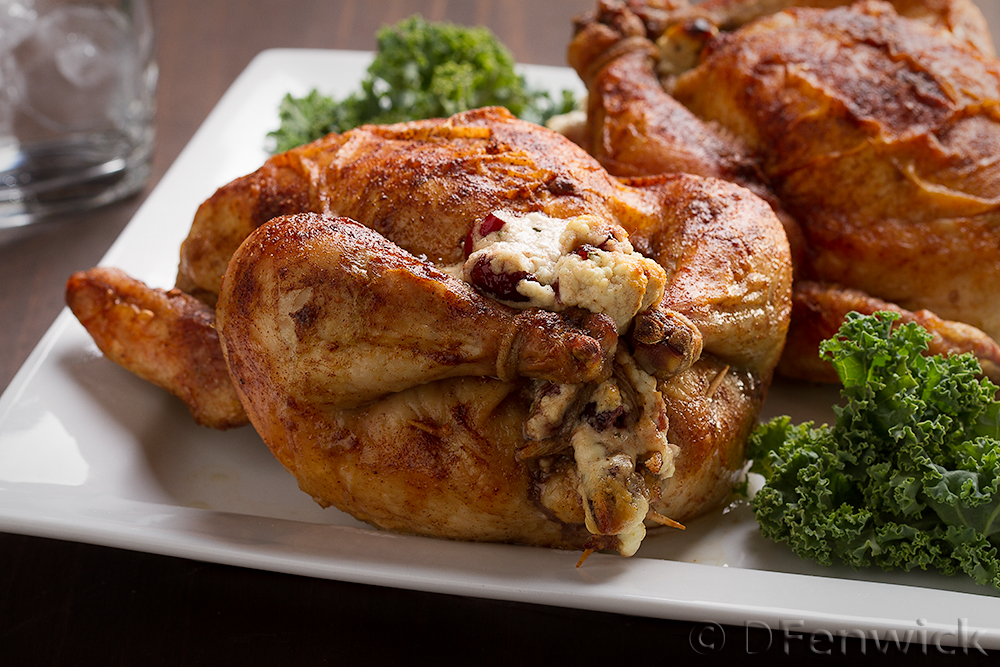
2 to 4 Cornish Game Hens

1 pound soft, white goat cheese
1/4 cup dried cranberries, chopped
2 sprigs fresh Rosemary, chopped
1/2 teaspoon Salt
1/2 Teaspoon ground Black Pepper
3/4 teaspoon Cinnamon

Seasoning:
1 tablespoon Seasoned Salt
1/2 teaspoon paprika
1/2 teaspoon cinnamon

Olive oil
tooth picks
kitchen twine

Preheat your oven to 350 degrees.
Wash and clean the game hens and pat dry with paper towels.  Pay extra attention to the cavity if you are opposed to any bits of organ meat.

To make the stuffing: combine the goat cheese, cranberries, rosemary, salt, pepper and cinnamon.  Blend gently with a fork.

The seasoning for the game hens is made by combining the seasoned salt, paprika and cinnamon in a small bowl.  Blend with a fork or your fingers.

Stuff the body cavity of each game hen with the cheese mixture.  Fill them completely.  There should be enough stuffing for 4 game hens.  Once the game hens are stuffed, use the toothpicks to hold the body cavity closed and tie the legs together with the kitchen twine.  You can use the twine to help hold the cavity closed as well.  Turn the wingtips behind the bird so they won’t burn while it is cooking.  Gently coat the game hens with olive oil and liberally sprinkle with the seasoning-salt mixture.

Place the game hens, breast up, on a cooking rack and bake for 1 1/2 hours or until a thermometer in the middle of the stuffing reads 165 degrees.  Let the game hens rest for about 15 minutes and serve.

If the game hens are very small, you can serve one per person.  If they are larger, cut them in half and serve half a game hen per person.

Note:  When handling poultry, be sure to wash your hands often and discard any partially used ingredients that might have been touched after you have touched the poultry without washing.  Be sure to thoroughly wash your cutting boards and any utensils used with the raw poulty.  We use a clorox solution for extra peace of mind.


Filed Under: Photo, Recipe Tagged With: cheese, Cornish Game Hen, cranberry, Dinner, goat cheese, Roasted, stuffing

Dippers Unite!

March 26, 2014 by Ginger 1 Comment

Asian Dipping Sauce by D Fenwick, http://dfenwickphotography.com

Asian dipping sauce with shrimp chips


Are you a condiment hoarder?   Do bottles of sauce take up more space in your refrigerator than “real food”?  If you answered yes, you’ve come to the right place, if you answered “Not yet!” even better – you still have room on the shelf!  Have I got a treat for your tastebuds…

This sauce is SOOOO delicious you’ll wonder where it’s been all your life – but you’ll have to go adventuring first, and track down your local Chinese market – a hidden gem in a sea of brand name grocery stores.  The reason is because your local grocer is unlikely to sell Tamarind Paste, the Fish Sauce can probably be found in the Asian aisle however, but your Chinese market will definitely have both.  Here’s your shopping list:

Ingredients:

1/4 cup rice vinegar (not the one with sugar aided, you want the plain one)
1/4 cup tamarind paste
2 Tb fish sauce
2 TB dark brown sugar (packed into the spoon and level)
1 TB vegetable or canola oil
2 garlic cloves finely minced
optional: 2 thai chilies finely minced

The process is simple enough, combine all the ingredients above stirring well.  Let sit at room temperature about 2 hours so all the flavors fully develop and get to know each other.  In the photo above the colorful “crackers” are shrimp chips also purchasable at an Asian market.  Made of shrimp paste, tapioca flour and water, these chips are dried to a hard almost translucent consistency, the frying process in your kitchen puffs them to the wonderful little crispy treats you see above.  Well worth the time believe me!

But if you’re not into shrimp chips, this lovely sauce can be used with wontons, egg rolls or anything else in your snackie go-to list that serves as a conduit for an Asian dipping sauce.  As that little “shrimp” of a kid Mickey used to say, try it – you’ll like it!

Filed Under: Photo, Recipe Tagged With: Asian Dipping Sauce, dip, shrimp chips, snack, tamarind

Shells Casserole

March 12, 2014 by Ginger Leave a Comment


Shells Casserole by D Fenwick, http://dfenwickphotography.com

Shells Casserole

I love pasta shells – little boats of yummy goodness that can be filled with mixtures from sweet to savory.  Today’s offering welcomes back crispy pancetta bits, and cheese.  Does it get any better?  Actually it does…

Ingredients:
1 box of jumbo pasta shells
1 lb hamburger
1 container pasta sauce of choice
~5 oz of cooked spinach, drained  (you can either use a box of frozen spinach or 1/2 bag of frozen organic, I place it in a bowl and pour a cup of hot water over it to defrost, then squeeze out the liquid later)
~2 cups shredded Mozzarella (vegan mozzarella is pictured above)
~1 cup shredded pecorino or parmesan
1 package of sliced pancetta from the deli (you can normally find this in the fine cheeses area).  Dice/chop the pancetta for easy frying.
1/4 tsp cinnamon
~ 1 Tablespoon of olive oil
pinch of salt

1.  Preheat the oven to 375 degrees F while you prepare the dish.
2.  Bring a large pot of water to boil.  Add pasta and cook until tender but not completely soft – remember, you’re going to be baking this later!  When the pasta is done remove and cool with cold water to stop the cooking process.
3.  While the water boils heat olive oil in a skillet and brown the sliced pancetta.  Remove pancetta with a slotted spoon onto a paper towel to drain.
4.  Add hamburger to fry pan and brown in pancetta oil.
5.  Drain hamburger and place in a large bowl, add pancetta, mozzarella, spinach and cinnamon.  Mix well.  Add salt to taste.
6.  In a large baking dish pour ~1 cup of the pasta sauce in the bottom and spread evenly.  Then carefully stuff a shell with ~2 tablespoons of hamburger mixture.
7.  Pour remaining pasta sauce over the shells when finished.  Place in oven and cook until the pasta bubbles and shell tips begin to turn brown (or the cheese is well melted).
8.  Serve with crusty bread, a glass of vino, a good movie, the possibilities are endless…


Filed Under: Photo, Recipe Tagged With: casserole, Dinner, hamburger, mozzarella, pasta shells, tomato

Italian Crescent Casserole – it’s a winner!

March 5, 2014 by Ginger 1 Comment

Italian Crescent Casserole by D Fenwick, httpo://dfenwickphotography.com

Italian Crescent Casserole

This recipe won a bake off competition back in 1978 and is posted, in it’s original form here.  We’ve changed it up a bit by changing out the cheese for dairy free versions and using Bison meat instead of regular hamburger.   The recipe is very easy and open to modification, so whether you add Pepper Jack cheese, or maybe use Turkey meat, you’ll save this recipe to eat again and again.

Ingredients:

1 lb ground meat (we used Bison)
~1/8 cup of finely chopped sweet onion
1 cup pasta sauce (we used “Traditional” but a brand heavier on garlic would be awesome!)
~2 cups shredded cheese – we used Vegan Mozzarella and Vegan Monterey Jack)
1/4 cup dairy free sour cream
1 can Refrigerated Crescent Dinner Rolls (TIP: keep this in the fridge until you need it)
1/2 cup grated Pecorino cheese (but you could use Parmesan)
~3 tablespoons butter or margarine (2 tablespoons need to be melted)
~1 tablespoon of herbs (we used a combo of rosemary, thyme & sage)
1 9″ pie pan

Preparation (please read all instructions first as you can be multitasking during the different preparation stages if you’re fast):

While your oven heats to 375 degrees F, melt a tablespoon of butter in your fry pan and cook your onions till translucent, then add meat stirring as needed until the meat is cooked through.  Remove any excess grease and add the pasta sauce and herbs.  Cook until the sauce begins to bubble and then reduce heat.

If you have not already done so, shred your cheese (mozzarella/jack)  into a bowl and mix in the sour cream.  In a separate bowl, add your shredded pecorino (or parmesan) and 2 tablespoons melted butter.  Mix well – this will be used as a spread later.

Pour the meat mixture into the bottom of your pie pan and carefully layer the sour cream mixture over the top.  Get the crescent roll container out of the fridge, open, and then lay the triangles over the mixture – arranging these so the points are in the center is the easiest!

Finally, carefully spread the butter-cheese mixture on the crescent rolls.  Place in oven and bake approximately 30mins or until your oven cooks the rolls to a golden brown.

Enjoy!


Filed Under: Photo, Recipe Tagged With: casserole, crescent roll, Dinner, ground bison, hamburdger

Goodbye Sochi, Hello Stoli!

February 26, 2014 by Ginger 1 Comment

Penne with pepper vodka sauce by D Fenwick http://dfenwickphotography.com

Penne with pepper vodka sauce


Here’s a tasty little recipe that will keep your own torch burning using a little Stoli Hot (jalapeño infused vodka).

Ingredients:

1 Box of Penne Pasta (1lb)
~2 Tablespoons each of Butter & Olive Oil
1/2 Sweet Onion, chopped
3-4 cloves of garlic, chopped
1 Cup of Vodka (1/2 Stoli Hot, 1/2 plain vodka)
1 Can Tomato Sauce (~15oz)
1 Cup Heavy Whipping Cream
1/2 Teaspoon Salt
~1/4 Teaspoon each of Rosemary, Basil & Thyme
Generous Cup of grated Pecorino Cheese (can substitute with parmesan)
Black Pepper to taste

How to cook it:

Set your pot of water on the stove and bring to boil.  Cook noodles per product directions.

While the water is coming to temperature, heat a frying pan on medium low with butter and oil, adding chopped garlic and onions when ready.  Allow these to cook ~10 mins or until translucent then add the vodka.  Bring this mixture back up to temperature (you can see it begin to steam and bubble), add the can of tomato sauce, herbs, salt & pepper.  Mix well and bring back up to temperature.

At this point I grab a strainer, mine is about 6″ wide and using a ladle pour my vodka sauce thru the strainer and back into the fry pan – so basically I am removing all the chunks of garlic and onion.  This is a personal choice of course, you can certainly leave them in, but I prefer a smoother sauce and the garlic and onions have already made their contributions to the party (IMHO).  Add the cream and mix well.  Grab your pecorino (or parmesan) and grate a generous cup of cheese – take 1/2 a cup or 3/4 cup whatever suits your fancy and dump that into your vodka sauce, mixing well.

The noodles should be done by now, so strain those out using a colander.  Fill your bowl with noodles, spoon some vodka sauce over the top and sprinkle on some additional cheese.  The Stoli Hot adds a subtle heat well suited to this creamy sauce.  You can also substitute the Stoli Hot with bacon infused vodka.  Yes, I said bacon!


Filed Under: Photo, Recipe Tagged With: Dinner, penne, pepper vodka, sauce, vodka

  • « Previous Page
  • 1
  • …
  • 7
  • 8
  • 9
  • 10
  • 11
  • Next Page »

Recent Posts

  • Hard Cider Brittle
  • Jalapeno Artichoke Dip
  • Beef and Pasta in Red Sauce
  • Steak – One Pan Meal
  • Grain Free “Strawberry Shortcake” Cookies
  • Meatballs with options for everyone at your party
  • Chicken for game day
  • Spaghetti with sliced beef
  • Baked Salmon in Puff Pastry
  • Christmas Dessert for Two

ARCHIVES

  • November 2016
  • June 2016
  • May 2016
  • March 2016
  • February 2016
  • January 2016
  • December 2015
  • November 2015
  • October 2015
  • September 2015
  • August 2015
  • July 2015
  • June 2015
  • May 2015
  • April 2015
  • March 2015
  • February 2015
  • January 2015
  • December 2014
  • November 2014
  • October 2014
  • September 2014
  • August 2014
  • July 2014
  • June 2014
  • May 2014
  • April 2014
  • March 2014
  • February 2014
  • January 2014
  • December 2013
  • November 2013
  • October 2013

Categories

  • Cooking Information
  • Event
  • Photo
  • Recipe
  • Recipe Modifications
  • Restaurant

Meta

  • Log in
  • Entries feed
  • Comments feed
  • WordPress.org

Copyright © 2025 · Foodie Child Theme by Shay Bocks · Built on the Genesis Framework · Powered by WordPress