Adventures in Thyme

Our adventures in food

  • Home
  • Contact

Lasagna Rolls

October 22, 2015 by Ginger Leave a Comment

Lasagna Rollups, rolling by D Fenwick, http://dfenwickphotography.com

Lasagna Rollups, rolling

So many times when confronted with cooking a meal for family I can’t ask “What do I want to eat?” because I know that not every can or will eat what I want to eat.  Instead I have to ask the question “What am I willing to eat?”. Tonight’s spin on lasagna helps alleviate some of that issue.  With a little extra time, and a nice selection of fillings not only can you achieve dinnertime bliss but you might get the kids involved with helping make dinner too.  So let’s get cooking!

Please keep in mind that this recipe is really more of an example, to show you how you can cook for a  number of people with varying tastes.  Change out any of my ingredients for ones you like better:

1 box of Lasagna Noodles – cooked just before al dente
1 lb fried Turkey “burger” meat
8 oz of goat cheese Feta
1 egg
5 0z of shredded Spinach (I used 1/2 of a frozen box of spinach)
caramelized Onions & Mushrooms
shredded Pecorino
finely chopped fresh herbs: Rosemary, Thyme, Oregano, Marjoram
Olive Oil
Marinara Sauce
Salt & Pepper to taste

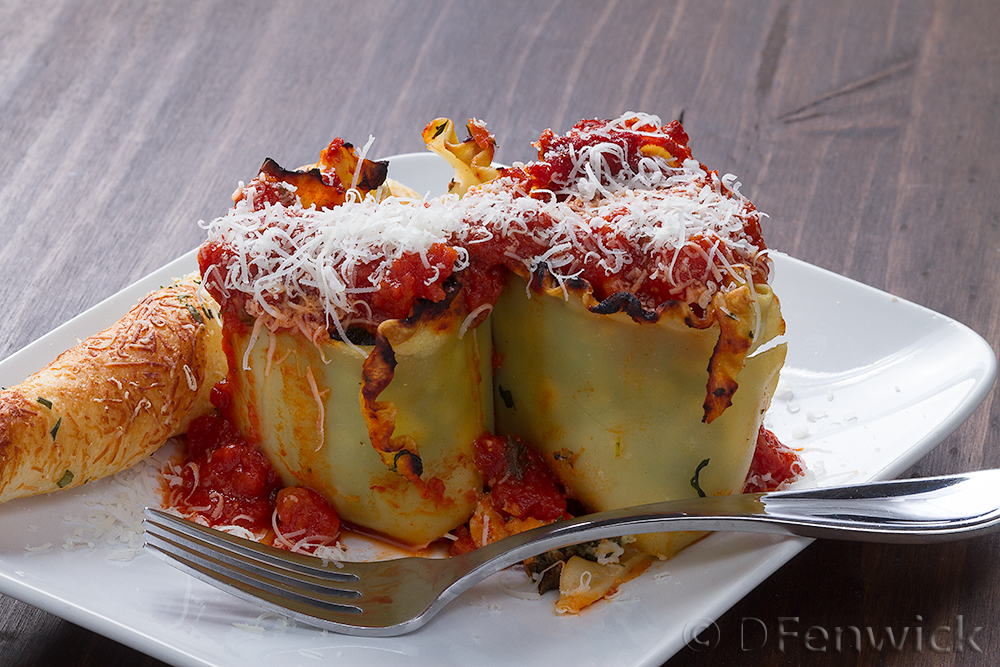
Preheat your oven to 375 degrees F and prepare a tall sided baking dish – as pictured below, your lasagna noodles will be standing upright, you’ll need the sides of the dish to be taller than the rolled noodles.  Pour enough marinara into the dish to cover the bottom and keep the noodles from sticking.

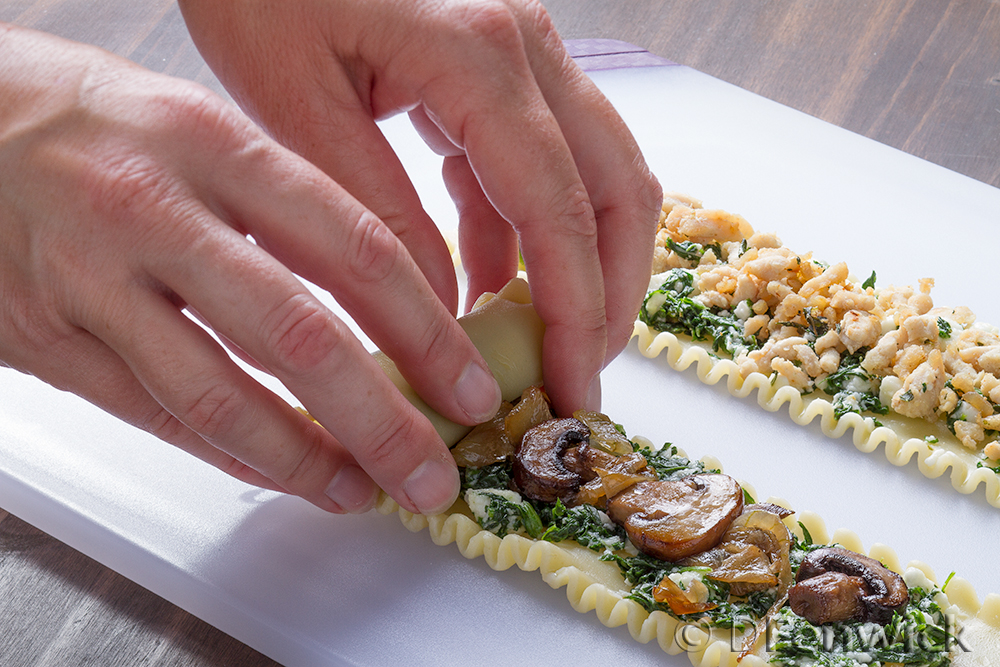
I seasoned and fried the turkey meat, and in a separate pan caramelized onions and mushrooms.  In a bowl I mixed the feta cheese, spinach, egg, 1/2 cup of pecorino, about two tablespoons of the herbs (combined) and about a tablespoon of olive oil.

When all your ingredients are getting close to done, cook your lasagna noodles to just before al dente.  They will cook more in the oven so you don’t want to boil them to al dente.

Now’s the time to individualize the rolls.  Lay out a lasagna noodle and place a thin layer of the spinach mixture as a base, then for the meat lover’s pasta roll add a couple spoonfuls of turkey and gently roll it up carefully placing it into the baking dish.  Lay out a 2nd lasagna noodle, add a layer of spinach mixture, and for the veggie lover’s selection add a layer of the onion & mushroom mixture.  These are thin layers, too much and rolling will be difficult and much of the layers will actually fall out of the roll, so be conservative with the layers until you get a feel for the quantity needed.

That’s really it, keep making noodles to match who wants what combination of filling.  When ready spoon marinara over the top of each noodle to add some moisture.  Cook about 30 minutes and bingo – dinner for everyone!

Enjoy!

Lasagna Rollups by D Fenwick, http://dfenwickphotography.com

Lasagna Rollups


Filed Under: Photo, Recipe Tagged With: Dinner, easy, lasagna, party, pasta, Turkey, vegetarian

Empire Biscuits

October 1, 2015 by Ginger Leave a Comment

Empire Biscuit by D Fenwick, http://dfenwickphotography.com

Empire Biscuit


As the weather changes in the Fall I start getting melancholy for my life back in England.  I miss the “old world”, the charm of cobbled streets, watching canal boats float lazily thru the locks and of course afternoon tea.  One of my fondest memories was nibbling Empire Biscuits along with a lovely cup’a tea.  Today’s recipe takes me back to that time so long ago when I could walk thru Shakespeare’s town, and stroll thru the hedge maze at Hampton Court.  Enjoy!

Preheat your oven to 325 degrees F.  I recommend using a printed silicone baking mat with cookie circles on it.

Cream together:
1 cup softened Butter (two sticks of butter)
1/2 cup Sugar

then add:
1 tsp Vanilla
1 Egg

finally mix in:
1 1/2 cups All Purpose Flour
1/2 cup Self Rising Flour

Strawberry Jam
Powdered Sugar (make a glaze out of ~ 2 cups and a bit of water)
Maraschino Cherries cut into fourths

The batter will be slightly sticky.  If you feel you can flour a surface, roll out the dough and cut circles – go for it!  I tend to flour a surface and roll the batter into the size of a long zucchini.  I then pinch off ~ tablespoon roll it into a ball and then carefully flatten it onto a cookie circle on my silicone mat.  They come out fairly uniform and you can tell from the picture they don’t look too bad!

Bake about 9-10 mins or until the edges begin to brown.  Once cool put a little strawberry jam on the “wrong” side of the cookie and then place a second cookie onto it so you’ve got a strawberry cookie sandwich.  With the back of a small spoon place a circle of glaze on the top of your cookie sandwich and top with a piece of cherry.

They are so delicious.  I need an intervention… 


Filed Under: Photo, Recipe Tagged With: cookie, Cookies, dessert, Empire Biscuits, snack, strawberry

Pumpkin Spice Latte Chip Cookies

September 25, 2015 by Ginger Leave a Comment

Pumpkin Pumpkin Spice MnM Cookies by D Fenwick, http://dfenwickphotography.com

Pumpkin Pumpkin Spice MnM Cookies


Fall seems synonymous with pumpkin, and more specifically pumpkin spice flavored items.  In a recent trip to my local market I see Pumpkin Spice Latte M&Ms.  So of course I needed to try it in a cookie.  I’ve reworked a previous pumpkin cookie we’ve had on the blog, it went well with these seasonal yummy candies.  Enjoy!

1. Begin by setting your oven to 350 degrees F.

2. In an electric mixer whip the following until it’s “light and airy”:

1/2 cup Sugar
1/2 cup firmly packed Brown Sugar
1 cup softened unsalted Butter

3.  To the mixture combine well:
3/4  cup canned Pumpkin
1 beaten Egg
1   tsp Vanilla

4.  The dry ingredients are next, combine these together and then add the dry mixture to your bowl and mix well:
2 cups all purpose Flour
1 tsp Baking Powder
1 tsp Baking Soda
1 tsp Cinnamon
1/4 tsp fresh ground Nutmeg
1/4 tsp Salt

5.  Fold in one package of Pumpkin Spice Latte M&Ms (it’s roughly 10 ozs).

Spoon generous tablespoons onto a baking sheet (I use nonstick baking mats in mine)  and bake for 10 mins.   These cookies don’t really spread out, but remain pretty much in the “footprint” you put them in.  You’ll know they are done when the cookie gets a golden brown appearance on it’s edges.

These cookies are best eaten after a few hours as the cake-y cookie crumbles easily if it’s even remotely warn.

6.  Pour yourself a glass of milk and let the nibbling begin.


Filed Under: Photo, Recipe Tagged With: Cookies, dessert, m and m, pumpkin, Pumpkin Spice Latte Chip Cookies

Mudslide Pudding Pie

July 30, 2015 by Ginger Leave a Comment

Mudslide Pudding Pie by D Fenwick, http://dfenwickphotography.com

Mudslide Pudding Pie


So there I was, enduring another abominable day at work, chomping carrot sticks like I was crushing the heads of my enemies when I came across a mudslide pudding shot recipe.  (Yes, I daydream of cocktails at work and Google is my partner in crime.)  The recipe was straight forward, and seemed to be replicated across a dozen foodie sites and a darling of Pinterest boards – but the serving was so small!  That teensy little pudding cup…it needed to be supersized to exorcise my demons.  So hide the scale, banish calorie counting and get ready for something over the top – Mudslide Pudding Pie.

For the filling:

1 cup cold milk (you could use 2% but why bother)
1 3.9oz package of chocolate pudding
3 oz Kahlua
3 oz Bailey’s Irish Cream
8 oz Cool Whip
1 chocolate pie crust
optional: shaved chocolate from dark chocolate bar (I used a 60% cacao bar)

Super easy – AND you can eat the batter without fear of salmonella.  Hello?!  The best tip I have for this recipe is to leave your cool whip in the fridge a few hours before you incorporate it into this recipe, you’ll want it fairly soft.  To begin: Whisk together the milk and pudding mix until all the lumps are gone.  Whisk in the Kahlua and Baileys, then carefully fold in the Cool Whip.  There will be a few lumps, just gently fold these down.  Pour into a chocolate pie crust until it reaches almost to the crust top.  You will have a bit of filling left over, so you can make some petite pudding shots if you’re willing.  (I just sat with the bowl in my lap and watched Sharknado 3 with a happy pudding smile on face.)  At this point you can artistically scatter chocolate shavings on your pie, or forego this step and just place your pie in the freezer.  I let mine sit for 24 hours before serving.  The pudding will warm fairly rapidly so remove from the freezer only when you’re ready to cut a piece.  Enjoy!


Filed Under: Photo, Recipe Tagged With: bailey's irish cream, chocolate, dessert, Kahlua, pie, Pudding

Banana Bread with White Chocolate

June 25, 2015 by Ginger Leave a Comment

White Chocolate Chip Banana Bread by D Fenwick, http://dfenwickphotography.com

White Chocolate Chip Banana Bread


Dad’s Day has come and gone, and  I usually bake a loaf of yumminess to send home with the Dad-in-Law at the end of the evening.  This year, I had the remains of a bag of white chocolate chips (from last week’s blondies recipe) so I decided to add them to a favorite banana bread recipe.

Did you know bananas are some of the most thrown out food in our households?  Sure they get brown and squishy – but that’s just sugary goodness for baked banana bread.  So before you throw out those little darlings – try this recipe (even if you don’t have the chips to add to it) and give it to someone you love and make their day a special one!

Preheat oven to 350 degrees F.  Prepare two loaf pans by buttering the inside evenly.

1 cup softened Butter
2 cups Sugar
2 teaspoons Vanilla
4 beaten Eggs
2 cups mashed Bananas (the browner sweeter ones)
Sift together:
4 cups Flour
2 tablespoons Baking Powder
1 teaspoon Salt
1 cup White Chocolate Chips

In a mixer, cream the butter and sugar well.  Add the vanilla and eggs and mix again, then add bananas.  Now mix in half the sifted ingredients, when it starts to incorporate evenly, add the remaining dry ingredients.  Remove the bowl from the mixer and fold in the chips.  Pour half the mixture into each pan and bake about 45 mins.  Check with a toothpick, if it comes out cleanly, you’re done, otherwise, cook in increments of 5 or 8 mins until it passes the toothpick test.

Let cool 20 or 30 minutes, loosen the edges in the pan and turn out onto cooling racks.  Let cool and enjoy.  For a little extra fun, serve with a scoop of vanilla ice cream for dessert.


Filed Under: Photo, Recipe Tagged With: Banana, Banana Bread, dessert, snack, white chocolate, white chocolate chips

  • « Previous Page
  • 1
  • 2
  • 3
  • 4
  • …
  • 11
  • Next Page »

Recent Posts

  • Hard Cider Brittle
  • Jalapeno Artichoke Dip
  • Beef and Pasta in Red Sauce
  • Steak – One Pan Meal
  • Grain Free “Strawberry Shortcake” Cookies
  • Meatballs with options for everyone at your party
  • Chicken for game day
  • Spaghetti with sliced beef
  • Baked Salmon in Puff Pastry
  • Christmas Dessert for Two

ARCHIVES

  • November 2016
  • June 2016
  • May 2016
  • March 2016
  • February 2016
  • January 2016
  • December 2015
  • November 2015
  • October 2015
  • September 2015
  • August 2015
  • July 2015
  • June 2015
  • May 2015
  • April 2015
  • March 2015
  • February 2015
  • January 2015
  • December 2014
  • November 2014
  • October 2014
  • September 2014
  • August 2014
  • July 2014
  • June 2014
  • May 2014
  • April 2014
  • March 2014
  • February 2014
  • January 2014
  • December 2013
  • November 2013
  • October 2013

Categories

  • Cooking Information
  • Event
  • Photo
  • Recipe
  • Recipe Modifications
  • Restaurant

Meta

  • Log in
  • Entries feed
  • Comments feed
  • WordPress.org

Copyright © 2025 · Foodie Child Theme by Shay Bocks · Built on the Genesis Framework · Powered by WordPress