Adventures in Thyme

Our adventures in food

  • Home
  • Contact

Pizza – Assemble!

August 14, 2014 by Ginger 1 Comment

Pizza Buffet by D Fenwick, http://dfenwickphotography.com

Pizza Buffet

Another summer is winding down.  New school year’s are starting, gardens are in full harvest mode, and everyone seems to be squeezing out all the “staycation” exuberance they have left.  So this week, we’re highlighting the ease and playfulness of a pizza buffet.

We are lucky enough to live in time where gluten free, dairy free, and organic products are almost as easy to find as “regular” products of similar ilk.  So offering a pizza buffet to family friends is easy as assembling together all the ingredients that float your unique culinary boat (ie: tolerated, suitable, tasty, adventurous).

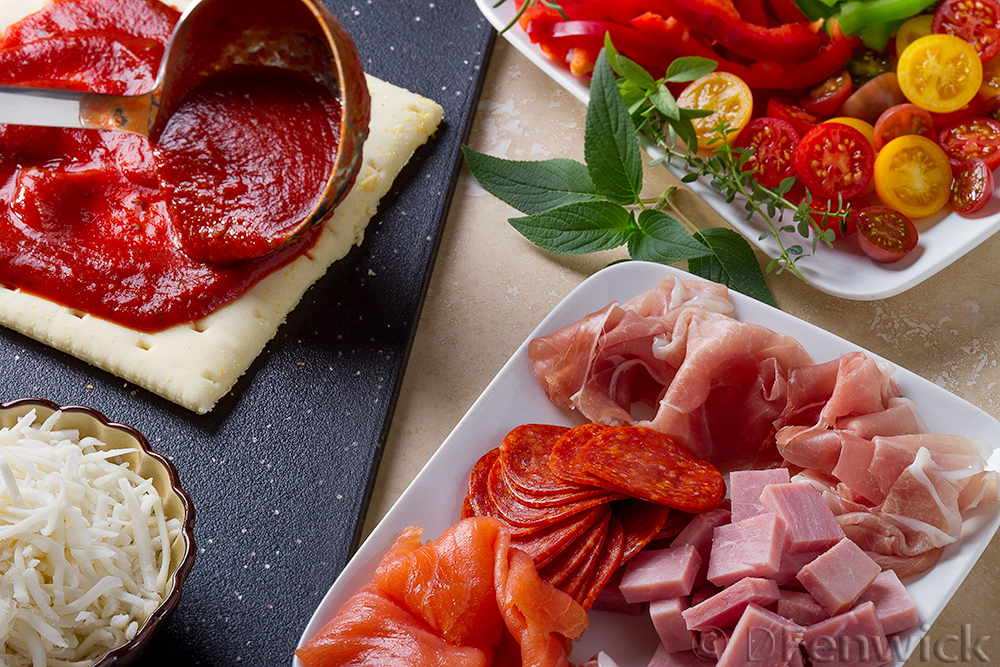
For our buffet we purchased pre-made gluten free pizza dough from the freezer section of our grocery store, and toppings such as:  Sheep Ricotta, Dairy Free Mozzarella, Buffalo Mozzarella, Prosciutto, Pancetta, Smoked Salmon, Pepperoni, Ham, Bell Peppers, and fresh herbs and tomatoes from our garden.  We also had berries, honey, and jam to pair with the ricotta for a pizza dessert.  You can cook your pizzas on a bbq or in the oven, however it works best for your buffet plans too!

Although we could have opted for a store bought pizza sauce, we chose to make our own, here’s the recipe we used for a quick sauce:

2 15oz cans of tomato sauce
1 6oz can of tomato paste
1 Tablespoon balsamic vinegar
2 Tablespoons honey
2-3 Tablespoons fresh chopped oregano
1 tsp salt
pepper as desired

Stir together over medium heat until just boiling then turn down and simmer until ready to use.

So use your pizza dough as a blank canvas on which you can paint your very own masterpiece of yumminess, and best of all – everyone gets to make their own leaving you just a few more dulcet moments to enjoy the pleasures of summer.


Filed Under: Photo, Recipe Tagged With: buffet, Dinner, party, pizza, pizza sauce, sauce

Beef Pot Pie

August 6, 2014 by Dan 1 Comment

Beef Pot Pie by D Fenwick, http://dfenwickphotography.com

Beef Pot Pie

Our little corner of paradise had a wonderful rainy spell lately.   So despite the fact that our normal temperatures are in the 90s, we had a hankering for pot pies.  Ideal for a stormy evening when all you want to do is snuggle down with a good book and listen to raindrops.

For the Filling:

1 1/4 lbs Beef (stew meat, roast, or what have you)
1/2 cup Flour
Salt Pepper

1 can diced Tomatoes
1 cup Red Wine
1 cup Beef Stock
1/2 medium onion
2 white Sweet Potatoes (about the size of a baking potato)
1/2 teaspoon Salt
1/2 teaspoon Pepper
1 teaspoon Cinnamon
few sprigs of fresh Thyme
2 leaves fresh Sage

12 oz. cut Green Beans (fresh or frozen)

For the Pastry:

2 cups Flour
2 sticks Butter
1 teaspoon Salt
2 eggs
1 tablespoon ice water

4 medium ramicans or other containers for baking your pot pies.

Combine 1/2 cup flour, some salt and pepper in a large ziplock bag. Cut your beef into small bite sized pieces and place in the zip lock back with the flour. Seal and shake to coat the beef evenly.

Heat a little oil in a medium sized pan, over medium heat. When the oil is hot, remove the beef from the bag, shaking off any excess flour, and place into the pan. Brown over medium heat, stirring occasionally, until browned on all sides.

While the beef is cooking, slice half of a medium onion.

When the beef is browned, add the onion, canned tomatoes, red wine, salt, pepper, cinnamon, thyme and sage to the pan, stir well and let cook over medium low or medium heat for 20 to 30 minutes.

While this is cooking, we’ll make the pastry. In your food processor, combine the flour, salt and butter and pulse until it forms pea sized pieces. Lightly beat 1 egg and add to the food processor, pulse until it is well blended in. Add about 1 tablespoon of ice water and pulse. The dough should form a ball in the food processor. If it’s too dry, add a little more ice water. (Not this dough is wet and somewhat sticky.) Form the dough into a ball and kneed for a few minutes. Cut the dough into 4 evenly sized pieces. Flour a board and roll the dough out until each piece is larger in diameter than your baking dishes for the pot pies. (You can set the pieces aside separated by parchment if you wish.)

Beat your remaining egg.

Heat your oven to 350 degrees F.

When the filling has cooked, remove from heat and add the green beans. Split the filling evenly amongst your 4 ramicans.  Tip: don’t over fill!   Using a pastry brush, brush egg around the top-outside of your baking dish and place the pastry on top. Fold over the edges and press down. The egg will seal the pastry to the top of the baking dish. Repeat for each baking dish. Make a small slit in the top of each pot pie to release the steam during baking. Brush the top of each pie with beaten egg so it browns up.  Optional: You can sprinkle a little kosher salt on top too.

Place your pot piece on the middle rack in your oven and cook for 30 to 40 minutes or until golden brown on top. Remove from the oven and let cool for a few minutes, serve hot.

For variations, feel free to use regular potatoes instead of sweet, add or substitute whatever vegetables you prefer and if you don’t like to cook with wine, substitute a second cup of beef stock, or 1/2 cup of beef stock and a small can of tomato sauce.

Enjoy!

Filed Under: Photo, Recipe Tagged With: beef, Dinner, pot pie

Lamb Calzone

July 23, 2014 by Ginger 1 Comment

calzone

Ta-da!  Our first “hand-pie” here at Adventures in Thyme.  This tasty treat can be partially made in advance and stored in the fridge until you’re ready to assemble and bake.  The frenchbread crust is ideal for the juicy filling.  It’s delicious so let’s get cookin’!

For the filling:
1lb ground lamb
1 diced medium onion
3 cloves finely minced garlic
1 cup sheep’s feta (but if you can only find goat, go for it!)
2 beaten eggs
~5-8oz of cut spinach (we just buy the little box of frozen spinach)
~1 tsp of salt
~1 tsp each of fresh minced rosemary and thyme
~1 Tablespoon of butter

On medium heat, heat the butter in a skillet and add the diced onion.  Fry until they begin to get translucent (about 8 mins).   While you’re waiting on the onions you have time to defrost the spinach (if you have not done so already). Quick and easy method is to place the frozen spinach into a fine strainer and either place in a bowl of warm water or hold under a faucet of warm water. Once the spinach is “loose” squeeze out the water. Take this as an opportunity to work out your frustrations – squeeze!!!  Set aside when done.

Once the onions are translucent add the lamb and cook until almost done (there’s still a little pink in the meat), add the garlic & salt and continue cooking.  Now we’re ready to add the spinach, our goal here is not to cook the spinach, that will happen when we bake the calzone, we’re only trying to incorporate the spinach evenly into the hot lamb mixture.  After mixing the spinach into the lamb, the meat should be done, so remove from the heat and carefully drain off as much of the grease as you can then stir in the herbs.  Allow this mixture to cool, then add the cheese and eggs.  IMPORTANT: If you add the eggs in while the mixture is hot, you will have scrambled eggs, but what we’re doing is adding the eggs as a binder, so we don’t want it to cook just yet.  Mix well.  At this point you can move on to assembly or place into the fridge for later in the week.  Our sauce recipe, below, can also be made in advance and stored until needed.

For the crust:
1 11oz container of French bread dough.  They come in a tube, the kind that pops.  You know which ones…
Rolling pin, smooth surface, ~ a cup of flour
Parchment paper

Prepare a smooth surface with a little flour so that our dough won’t stick, then remove the dough from the tube and cut in half.  Roll each half into a ball with your hands.  Carefully roll out each dough ball into a circle (think pizza) about 1/8″ thick, maybe a little thinner.  Transfer each rolled piece of dough onto parchment paper slightly larger than the dough.

Assembly:
1 beaten egg
Baking pan

Begin heating your oven to 350 degrees F.

Place one of the pieces of parchment paper onto your baking pan.  Place 1/2 of the meat filling onto one half of the dough (you will fold the other half over to make the top.)  IMPORTANT: Do not add meat to the edges, you will need space to seal, roll and crimp (look at the image above for reference).  Once the meat is on the dough brush your beaten egg mixture along the outside curve of your dough, about 1/2 inches worth.  Now carefully fold your dough over matching the edges, now, brush more of your beaten egg along the top edge of the dough, brush from the edge of the meet out to the edge of the dough.  Roll the edge over the egg to seal the edges and crimp with the back of a fork.  Do the same with the 2nd piece of dough/parchment.  You might need to cut the parchment at this time so both calzones can fit onto your baking sheet.

Once you have two complete calzones, take the remaining egg wash and brush the surface of each calzone, this will help them brown up so enticingly.  Now cut 3 slits along the top of each to allow steam to release during the cooking process.  Place into the oven for about 45 minutes or until the dough is a lovely golden brown.

While the calzone is cooking it’s time to start our sauce.

Sauce:
2 15oz cans of tomato sauce
1 can tomato paste
1/4 cup honey
1/4 cup balsamic vinegar, I like the one from Wine Country Kitchens
2 tsp chopped fresh rosemary
1/2 tsp chopped fresh thyme
1/2 tsp salt
1/2 tsp ground black pepper
1/2 tsp cinnamon

Into a saucepan add all the ingredients above and cook over medium heat.  Stir occasionally, turn down to a simmer once it begins to boil.  The longer your sauce cooks the thicker it will get so cook it to your preference.

To serve, cut the calzone in half, place on a plate and top with the sauce.  This serves four if you have side dishes to go with it.  We’d recommend a nice salad, some fresh vegetables and maybe a dinner roll or some garlic bread.

Enjoy!

Filed Under: Photo, Recipe Tagged With: balsamic vinegar, calzone, Dinner, feta, Lamb Calzone. lamb, spinach

Balsamic Glazed Pork Chops

July 2, 2014 by Dan 1 Comment

Balsamic Glazed Pork Chops

Balsamic Glazed Pork Chops

We’re firing up the bbq again for this delicious Balsamic Glazed Pork Chops dish.  The glaze is a lovely balance between the acidity of vinegar and the sweetness of honey.   We’ve placed it over rice noodles but you could easily substitute fried rice or a baked potato.  Let’s get cookin’!

Ingredients:

1/2 cup good Balsamic Vinegar
1/4 cup Honey
fresh Rosemary
Salt
Pepper
Cinnamon
4 Pork Chops
Noodles / fried rice / vegetables as desired

Light your bbq, you’ll want a direct fire.  We prefer charcoal.

Finely chop a sprig of fresh rosemary.

In a small sauce pan, combine 1/2 cup balsamic vinegar (for best results, use a good balsamic, I like the one from Wine Country Kitchens.) and the honey.  Add half of the chopped rosemary. Heat over low heat until the honey combines with the vinegar and the mixture begins to thicken.  Keep just warm so it doesn’t over thicken.  You will need to be able to pour or spoon the glaze.

Season your pork chops by lightly sprinkling with salt, pepper, a little cinnamon and the remaining rosemary.  Be sure to season both sides of the meat.  Grill for 10 to 15 minutes per side (depending on how thick your chops are and how hot the fire is.  In cold weather it may take longer to cook them.  An open grill may also take longer.)  Five minutes before the chops are done, spoon some of your glaze over the pork chops, cover and let the chops finish cooking.

We served these chops over noodles and drizzled the remaining glaze over the noodles and chops.  In the background above  you can see bbq’d apples with a little bit of spiced brown sugar.  Your grill is still hot – add a little bit of dessert before you shut the bbq down and take another bite out of summer’s bounty.

Enjoy!

Filed Under: Photo, Recipe Tagged With: balsamic, balsamic vinegar, chops, Dinner, glaze, glazed, Pork, pork chops, rosemary

Grilled Chicken Tacos

June 25, 2014 by Dan 1 Comment

Grilled chicken tacos by D Fenwick, http://dfenwickphotography.com

Grilled chicken tacos

With summer upon us and ye olde bbq dusted off, this week’s recipe is a delightful grilled chicken taco with lots of fresh fixin’s nestled in corn tortillas.  This recipe takes a little extra effort, but it’s worth the wait – Let’s get cookin’!

Taco Seasoning:

1 Tablespoon Chili Powder
2 teaspoons Salt
1 teaspoon dry Oregano, crushed
1/2 teaspoon Cumin
1/2 teaspoon granulated Garlic
1/2 teaspoon granulated Onion
1/2 teaspoon Paprika
1/4 teaspoon ground Black Pepper

Combine the spices and set aside. (Can be stored in a spice bottle for a long period of time to use with beef, ground beef, chicken, etc.)

Salsa:

6 Roma Tomatoes (3 of these will be roasted)
1 Green Bell Pepper (to be roasted)
1 Yellow Bell Pepper (to be roasted)
3 Jalapeno Peppers (2 of these will be roasted)
1 medium to large Onion (will be roasted)
4 cloves Garlic
1 Lime
Salt
Olive Oil

Salsa and BBQ’ing the veggies:

While your  BBQ is heating. Halve and seed three roma tomatoes and both bell peppers. If you don’t want a really spicy salsa, also halve and seed your jalapeno peppers (otherwise, you just leave those seeds in there!). Peal the onion and cut into 8 to 12 wedges. When the bbq fire is hot, make a small pan out of heavy aluminum foil and place the three seeded tomatoes, both bell peppers, 2 jalapenos and your onion into the pan. Add a bit of olive oil to coat and prevent sticking, sprinkle with salt and place on a rack over your fire. Cook for about 10 minutes then turn everything over and cook for another 10 minutes or until the peppers are charred and the onion is mostly cooked (do not cook the onion or peppers to mush, just until a bit tender.)

While the peppers and onion are grilling cut up your remaining 3 tomatoes and place in a bowl.  Finely dice your remaining jalapeno and add it to the tomatoes.

When the peppers and onions are cooked, set these aside in a bowl covered with food wrap for about 10 minutes, then remove any skin that has been loosened by the bbq process.  Place the tomatoes and half the onion in a blender or food processor. Add one of the roasted jalapenos and the garlic. Blend until mostly smooth.

Take the remaining onion and the bell peppers and cut into about 1/4 inch pieces, place these in a bowl. Finely mince the remaining roasted jalapeno and add to the bowl. Then add the puree from above and stir gently, followed by the juice of one lime and stir. Add salt to taste. Let sit at least half an hour before assembling your tacos.

Note: this will get spicier as it sits.

Grilling the chicken:

2 1/2 pounds boneless, skinless Chicken Breast (boneless thighs would also work well)
Taco Seasoning (from recipe above)
2 Tablespoons Olive Oil

Place one breast at a time into a ziplock bag and fold the end over (do not seal). Pound the chicken flatter with a meat mallet. This will help ensure more even cooking.

Sprinkle the chicken with your taco seasoning and place into a zip lock bag. Add the olive oil. Squeeze the air out of the bag and seal. Squeeze around so the oil covers all of the meat. Place in your refrigerator for at least 2 hours to overnight.

Grill over direct heat for 10 to 15 minutes per side (depending on how hot your fire is) until the chicken is done. Place on a plate and cover with foil for 10 minutes. Slice the chicken across the grain.

Almost there…  Taco time!

Salsa
Grilled Chicken
Sour Cream
Tortillas
Shredded Cheddar Cheese (or Cotija would be good too!)
Lettuce
Fresh Cilantro

To assemble your tacos, heat your tortillas in a skillet, lightly brown but do not make crispy. Place a few pieces of chicken into the tortilla, add lettuce, salsa, cheddar cheese and sour cream. Sprinkle a little chopped, fresh cilantro over the top. Serve immediately.

Enjoy!

Filed Under: Photo, Recipe Tagged With: chicken, Dinner, grilled, grilled chicken, salsa, taco, tacos, tomato

  • « Previous Page
  • 1
  • …
  • 5
  • 6
  • 7
  • 8
  • 9
  • …
  • 11
  • Next Page »

Recent Posts

  • Hard Cider Brittle
  • Jalapeno Artichoke Dip
  • Beef and Pasta in Red Sauce
  • Steak – One Pan Meal
  • Grain Free “Strawberry Shortcake” Cookies
  • Meatballs with options for everyone at your party
  • Chicken for game day
  • Spaghetti with sliced beef
  • Baked Salmon in Puff Pastry
  • Christmas Dessert for Two

ARCHIVES

  • November 2016
  • June 2016
  • May 2016
  • March 2016
  • February 2016
  • January 2016
  • December 2015
  • November 2015
  • October 2015
  • September 2015
  • August 2015
  • July 2015
  • June 2015
  • May 2015
  • April 2015
  • March 2015
  • February 2015
  • January 2015
  • December 2014
  • November 2014
  • October 2014
  • September 2014
  • August 2014
  • July 2014
  • June 2014
  • May 2014
  • April 2014
  • March 2014
  • February 2014
  • January 2014
  • December 2013
  • November 2013
  • October 2013

Categories

  • Cooking Information
  • Event
  • Photo
  • Recipe
  • Recipe Modifications
  • Restaurant

Meta

  • Log in
  • Entries feed
  • Comments feed
  • WordPress.org

Copyright © 2025 · Foodie Child Theme by Shay Bocks · Built on the Genesis Framework · Powered by WordPress